Additional Linux Commands & Guides
Additional troubleshooting commands & help guides for software installed on systems.
- Small Commands, Issues And Guides - A Collection
- Juniper Switching CLI & J-Web - A Collection
- Transferring server data between two dedicated systems - Wget & Python3
- Cannot Access UDP Connected Games Due To OVH Firewall
- Accessing A Website Or Control Panel Shows "Too Many Redirects" Error
- Error 1014 Tebex - CNAME Cross-User Banned
- Why Is X Not Installed On The System - How Docker Images Work
- PHP Extensions Locations For .so Files
- Installing Modules On cPanel For WHMCS - IonCube, FileInfo & Soap
- LiteSpeed WebServer With Pterodactyl (CyberPanel)
- Searching Through Files - Finding A Particular String And Updating It
- Installing SQLite3 To SQL with Python3 Package To Convert SQL-Lite DB to MySQL for import
- ItemsAdder With CloudFlare Proxied Domain For IP Protection
- Get the “/dev/disk/by-id” information for FSTab from the udevadm command
- Resizing single volume group and logical volume after disk expansion
- Resizing a logical group then volume within a parented RAID number
- CloudFlare does not minify javascript correctly when working with Grafana
- Install Custom Version Of MySQL Server
- Networking With Hetzner - With and Without additional MAC's configured
- Running Lancache & Another Webserver On Top
- Installing Debian/Ubuntu & Then Disk Unmounts - Debootstrap Error
- Break Into VirtFusion Software If Admin Password Is Lost
Small Commands, Issues And Guides - A Collection
This page is for commands, issues or guides which don't need to be added as a separate page. You can search for them with Ctrl + F or click the "Search" at the top.
Only Allow PublicKey Authentication Overriding Password Auth
No idea why, some systems are completely ignorant and ignoring the demand for no password auth.
Add this line to bottom of SSHD config. No idea why, but the The PA parameter is no and ChallengeResponseAuthentication is also no, but still auths with password... sigh.
AuthenticationMethods publickey
Give A MongoDB User Permission To Command "mongodump”
use admin
db.grantRolesToUser( "USER", [ "readWrite" , { role: "readWrite", db: "config" } ] )
Remove Apache2/Nginx Python3’s modules for Certbot
Apache2: python3-certbot-apache
Nginx: python3-certbot-nginx
Remove a package that is being stubborn and will not remove
sudo dpkg --force-all -P <package-name-to-remove>
Absolute headache with MySQL 8.0 mixing with MariaDB’s installs
MySQL 8.0 has the config file in /etc/mysql/mysql.conf.d/mysqld.cnf like MariaDB has /etc/mysql/mariadb.conf.d/50-server.cnf.
BY DEFAULT MySQL binds publicly… MariaDB binds to internal localhost.
Use mysqld --verbose --help | grep bind to actually see it bind publicly on first installation…
If you mix MariaDB’s config files + MySQL’s, it’s not my.cnf, mysql.cnf, the conf.d folder entirely or any other configuration. It is literally mysqld.cnf in the mysql.conf.d folder. What utter BS.
Fixing the repository error for changing it’s “version” for updates
Example: N: Repository 'http://deb.debian.org/debian bullseye InRelease' changed its 'Version' value from ‘11.7' to '11.8'
One command: apt-get --allow-releaseinfo-change update
Taken from: https://www.reddit.com/r/debian/comments/ca3se6/for_people_who_gets_this_error_inrelease_changed/
The certbot command that actually works to change the email
certbot update_account –email <email>
SlimeWorldManager Installation
- Download the latest Spigot/Paper jar you require and pop it into the main directory.
- Put the slimeworldmanager-plugin-<version>.jar into the same place as the server.jar.
- Update your startup command to include -javaagent:<thejar>, like the below:

Taken from: https://github.com/cijaaimee/Slime-World-Manager/blob/master/.docs/usage/install.md
Crons not running for WHMCS on cPanel - They hang and sit there doing nothing
- Log into WHM (The admin side of cPanel)
- Navigate to "MultiPHP INI Editor" by searching it on the left hand side.
- Select the version of PHP that your site uses, using the editor is easier.
- Increase the following variables:
- "max_execution_time" - 240/300 should be fine.
- "max_input_time" - same as above.
- "memory_limit" - Higher than 1024M.
- Click "Apply"
- Repeat for all versions of PHP that are having a timeout error.
- Restart cPanel's FPM with systemctl restart ea-php81/82-php-fpm.
RAID Ubuntu 20.04
Taken from: https://kifarunix.com/setup-software-raid-on-ubuntu-20-04/
Note - If you get error: partition length of [BIGGERSIZE] sectors exceeds the msdos-partition-table-imposed maximum of [SMALLERSIZE]
Switching RAID 1 to RAID 0
Scroll down a bit to locate the answer from nmr, which includes removing the mirror, changing, waiting then resizing.
Remove .html/.php extension
Read the answer from Arnon, the big threaded part with explanations.
Taken from: https://stackoverflow.com/questions/38228393/nginx-remove-html-extension
Can't run a module or build a NodeJS app due to no such file and has no installation candidate


One simple command to clear out the old NPM packages already downloaded from cache.
npm clean-install
You can then go about reinstalling with yarn build or another method used.
Any NPM package doesn't install into /usr/local/bin, such as ghostcms - Updating the prefix location due to weird bug
Taken from: https://askubuntu.com/questions/1102579/using-npm-to-install-file-to-usr-local-bin
For some weird reason, on some installs of NodeJS and then installing npm, it ends up at /usr and not /usr/local to allow /usr/local/bin packages to be viewable, such as GhostCMS's ghost-cli. Stupid bug, no idea why. Run the set prefix command to fix it, then install Ghost's CLI fine.
The reason why this needs doing is due to the error "Error: Cannot find module '/usr/local/bin/ghost'" and "MODULE_NOT_FOUND" which is absolutely idiotic since you literally just installed it, but in the wrong place. This will happen when trying to start the service and it fails.
root@S01:/var/www/website.com# npm get prefix
/usr
root@S01:/var/www/website.com# npm config set prefix /usr/local
root@S01:/var/www/website.com# npm get prefix
/usr/local
sudo npm install ghost-cli@latest -g
Date command in linux - Echo and crontab support
When using the date command in terminal, if you are echoing the line, you need to make sure you don't escape the percentages as it will include the slashes.
- echo $(date +"\%d-\%m-\%Y").txt

- echo $(date +"%d-%m-%Y").txt

However, when inside crontab, you will need to escape them otherwise cron believes it is an operand and not a variable to pass. And example is below where you also need the path in a full string for it to echo properly and understand the date variable.


You can also use -d for naming how we name things, such as "yesterday" "tomorrow" or "2 months ago".

- Note: You can also do broken English such as "2 month ago" instead of months!
- Taken from: https://stackoverflow.com/questions/17015187/how-does-date-d-parse-dates
List hardware device information for PFSense & FreeBSD OS
Command lshw does not exist on these platforms, use pciconf -lv.

Qemu Image mounting & commands on normal OS and Ceph installed systems
Run: apt install qemu-utils && modprobe nbd max_part=8
Connect: qemu-nbd -c /dev/nbd0 a-disk-which-is-formatted-in-qcow2-format.img
Disconnect: qemu-nbd -d /dev/nbd0
Get information of a image: qemu-img info a-disk-which-is-formatted-in-qcow2-format.img
Converting:
qemu-img convert -f qcow2 -O raw image-to-convert.img image-to-get-as-raw.raw
qemu-img convert -f raw -O qcow2 image-to-convert.raw image-to-get-as-qcow2.img
If disk is an LVM drive (With LVM partitions basically) and cannot be mounted/viewed to get to the root partition, you need to update the LVM configuration file.
nano /etc/lvm/lvm.conf
Replace: global_filter=["r|/dev/zd.*|","r|/dev/rbd.*|"]
With: global_filter=["r|/dev/zd.*|","a|/dev/rbd.*|"]
Then complete the following:
Run: pvscan && lvscan
Then enable with: vgchange -ay
Run: mount /dev/<VG_NAME>/<LV_NAME> /mnt/<LOCATION>
Once you're done using the mounted LVM drive:
Run: vgchange -an <VG_NAME>
IE: vgchange -an vg0 (Doesn't actually mean now active, it is actually unmounting it #stupidLVM)
Get ceph pools: ceph osd pool ls
List: rbd ls <POOL-NAME>
Map a drive to be viewed: rbd map ceph-disk/vm-<ID>-disk-0
Remove a mapped drive: rbd unmap /dev/rbd0
Export: rbd export <POOL-NAME>/vm-<ID>-disk-0 vm-<ID>-disk-0.raw
Import: rbd import <LOCATION> <POOL-NAME>/<IMAGE-NAME>
Remove image from ceph cluster entirely for that VM (Careful):
rbd remove <POOL-NAME>/vm-<ID>-disk-0
Get into an OS that is stuck on the Grub boot window
This section only applies if you knew the OS booted before, but now doesn't work. This is probably because you moved a virtual machine between hosts and/or software, like raw to qcow2, or from VirtFusion/Standalone to Proxmox, etc.
You might need to boot into gparted to potentially grab the vmlinuz images to boot off of (what their names are and mount the drive, ls them, etc, BUT you might be able to do ls inside of your grub after setting the root=. (Such as set root=(hd0) then ls)
set root=(hd0)
linux /boot/vmlinuz-x.x.x-amd64 root=/dev/<DRIVE> ro
initrd /boot/initrd.img-x.x.x-amd64
boot
EXAMPLE:
set root=(hd0)
linux /boot/vmlinuz-5.10.0-33-amd64 root=/dev/sda ro
initrd /boot/initrd.img-5.10.0-33-amd64
boot
Running the "boot" command will make it freeze, wait up to 1 minute as it will glitch out and finally boot into normal OS. You can then repair grub with update-grub/update-initramfs -u -k all, etc.
Fix syncing of MySQL servers not syncing when both master & slave
Run this on server 2:
STOP SLAVE;

CHANGE MASTER TO
MASTER_HOST='MYSQL-01.abc.com',
MASTER_USER='<username>',
MASTER_PASSWORD='<password>',
MASTER_LOG_FILE='mysql-bin.000001', -- from MYSQL-01 "SHOW MASTER STATUS;"
MASTER_LOG_POS=753, -- from MYSQL-01 "SHOW MASTER STATUS;"
MASTER_SSL=1,
MASTER_SSL_CA='/etc/mysql/ssl/ca-cert.pem',
MASTER_SSL_CERT='/etc/mysql/ssl/server-cert.pem',
MASTER_SSL_KEY='/etc/mysql/ssl/server-key.pem';
START SLAVE;
Run this on server 1:
STOP SLAVE;

CHANGE MASTER TO
MASTER_HOST='MYSQL-02.abc.com',
MASTER_USER='<username>',
MASTER_PASSWORD='<password>',
MASTER_LOG_FILE='mysql-bin.000003', -- from MYSQL-02 "SHOW MASTER STATUS;"
MASTER_LOG_POS=157, -- from MYSQL-02 "SHOW MASTER STATUS;"
MASTER_SSL=1,
MASTER_SSL_CA='/etc/mysql/ssl/ca-cert.pem',
MASTER_SSL_CERT='/etc/mysql/ssl/server-cert.pem',
MASTER_SSL_KEY='/etc/mysql/ssl/server-key.pem';
START SLAVE;
When running "mysql" command in terminal, login prompts for password.
This happens due to the password being modified for the root user, such as breaking into it from networking only mode, or from transferring the "mysql" database which houses the user logins. You need to make the root user login with "unix_socket" to be able to just simply run "mysql" in terminal without a password again using the following command:
ALTER USER 'root'@'localhost' IDENTIFIED WITH unix_socket;Juniper Switching CLI & J-Web - A Collection
This page is for the Juniper Switching CLI or J-Web interfaces which don't all need separate pages. You can search for them with Ctrl + F or click the "Search" at the top.
The terminology used in this documentation is listed below:
• Run – Run the command and press enter. No other interaction needed. No output will appear.
• Type – Type a word, most of the time being Boolean (yes/no, true/false).
Configuring Virtual Chassis EX Series
Sadly, this takes you to a PDF and you need to use Wayback machine to get the snapshot of:
https://web.archive.org/web/20231201042147/https://www.juniper.net/documentation/us/en/software/junos/virtual-chassis-ex-4200-4500/topics/task/virtual-chassis-ex4200-cli.html
Enabling J-Web Interface
Connect the COM cable or use the IP address of the system and SSH to it. Login as normal.
Run cli
Run edit
Run delete interfaces
Run set interfaces vlan.0 family inet address 192.192.0.x
(replacing x with the end IP for the management interface)
Run commit
Wait for synchronization to complete.
Description: We have removed all interfaces and configured the vlan.0 interface to 192.192.0.x, x being the end of the switches management IP address temporarily. Without this being set, the switch will complain that no interfaces have been configured for vlan.0.
Run set interfaces vme unit 0 family inet address 192.168.0.x/<subnet>
(replacing x with the IP for management interface, the vme IP)
Run set system services ssh root-login allow
Run set system services web-management management-url 192.168.0.x/root
(replacing x with the IP for management interface web portal, same as the vme IP set earlier)
Run set system services web-management http interface vme
Run set system services web-management https port 443
Run set system services web-management https system-generated-certificate
Run set system services web-management https interface vme
Run commit
Wait for synchronization to complete.
Description: We have updated the management interface, J-Web, to show the webpage instead of “Connection Refused”. This is believed to be happening because of it binding the interface to me0, not vme, which is the virtual chassis interface. Citation Needed.
Switching Between Primary Master & Backup Switches
Connect the COM cable or use the IP address of the system and SSH to it. Login as normal.
Taken from: https://www.juniper.net/documentation/us/en/software/junos/cli-reference/topics/ref/command/request-chassis-routing-engine-master.html
Run cli
Run request chassis routing-engine master switch
Type yes
You will be disconnected after about 1-2 seconds on the switch you are connected on (either master or backup) and you will need to wait around 5 minutes before issuing this command again.
Save Time With Making Synchronize Default
This section allows you to set the command commit to always run commit synchronize without you needing to write that word afterwards.
Connect the COM cable or use the IP address of the system and SSH to it. Login as normal.
Run cli
Run edit
Run set system commit synchronize
Run commit synchronize
On next command run of commit, it will run commit synchronize. This should be visibly apparent that it worked as you will see fpc0 and fpc1 sync along the left when committing between them when in virtual-chassis mode.
Switching ROM On Switch
Connect the COM cable to the switch you wish to switch ROM on. This is good for getting to a different firmware version if it decided to downgrade due to not being the same, configuration resync or getting back from Linecard to Master/Backup due to version issue.
Note: Due to the command request session member X, a COM cable isn’t required.
Run request system reboot slice alternate media internal
Type yes
Wait for switch to restart. This will countdown on 60 seconds, 30 seconds and immediately, respectively.
Syncing Current ROM With Redundant ROM
SSH or connect the COM cable and run the command below to sync the current system configuration and OS version to the redundant ROM AND between both the fpc0 and fpc1.
Run cli
Run edit
Run run request system snapshot slice alternate
Get Full System Info From Both Switches (Virtual Chassis)
Obtain the system information from both switches such as the state, temperature, memory and CPU usage, model, serial number and last reboot reason.
Run cli
Run show chassis routing-engine
Login To Alternative Switch In CLI Mode For Logs/Configuration
To get into an additional member of the virtual chassis, you can run the below command to access it instead of running the switch routing-engine command. For example, member 0 is top switch, member 1 is bottom switch if running in a 2 system virtual-chassis. Replace X with the switch member number. For locating the number, you can Run show virtual-chassis to view member numbers.
Run cli
Run request session member x
Enabling SNMP v3 on Juniper 4200/4500 switches
set snmp v3 vacm security-to-group security-model usm security-name <USERNAME> group read-only-group
set snmp v3 vacm access group read-only-group default-context-prefix security-model usm security-level privacy read-view read-only-view
commit comment "Preparation For SNMPv3"

set snmp v3 usm local-engine user <USERNAME> authentication-sha authentication-password "<CRYPTO_PASSWORD>"
set snmp v3 usm local-engine user <USERNAME> privacy-aes128 privacy-password "<PASSWORD>"
set snmp view read-only-view oid .1 include
show snmp
commit comment "Setup SNMPv3 For <APPLICATION>"
For TenantOS, the settings to select are below:
Setup Syslog to an endpoint IP listening for Syslog data
set system syslog host <IP> any any
set system syslog file messages any any
commit comment "Activate Syslog Data Collection"
Installing LLDPD to get data from the port connected and query the switch
Using this will tell you all the connection information from the switch, such as what port, what the switch name is, vlans it's providing to you, etc.
apt install lldpd -y && /
lldpctl
Need to rename a VLAN on the switch and need to find out which members are in that VLAN so you can delete it safely?
This can also be used to prepare who has duplicate VLAN names such as "ClientVlan" and "Vlan.3" basically meaning, it has the named version of vlan 3 and the numerical version. Running this command helps you clear out those "named vlan" problems which originate by making the vlans on the JWeb interface before being comfortable with CLI. This will then give you the chance to rename a vlan later on with rename vlan command, etc.
cli -c "show configuration interfaces | display set" | grep "family ethernet-switching vlan members <VLAN>" | awk '{print "delete", $2, $3, $4, $5, $6, $7, "vlan members <VLAN>"}' > /var/tmp/<VLAN>.conf
Transferring server data between two dedicated systems - Wget & Python3
The easiest way to transfer a tarball or zip file from one dedicated system to another is by using wget and a python3 webserver, protected from sending out the data from UFW allow in only that IP address or using the internal network if your system has it, such as OVH's vSwitch/vRack system.
Open up SSH. In this example, we will be using Pterodactyl's UUID's in the volumes folder, but this also applies to any zip/tarball you want to do this on such as servers stored in /home or /srv.
Go to cd /var/lib/pterodactyl/volumes and then do ls to see the containers.

We will use "031d5..." as an example. Run tar -zcvf SERVERNAME.tgz 031d5 then press tab to autofill the entire server ID.
![]()
Let it finish tarballing. You'll know when it's finished as the output stops showing you what files it's archived and goes back to the normal terminal line waiting input.
![]()
Do ip a on your destination system and find the public IP. Remember, some systems have internal networking so you might be able to do "wget 10.10.10.1:8000/hub.tgz" for example instead of the public IP and whitelisting it, as it normally is already whitelisted.

Once you've found either the public or the private IP, go back onto your source system and type ufw allow from x.x.x.x changing the x's to your IP.

You can now type ip a on your source system to get its IP you need.

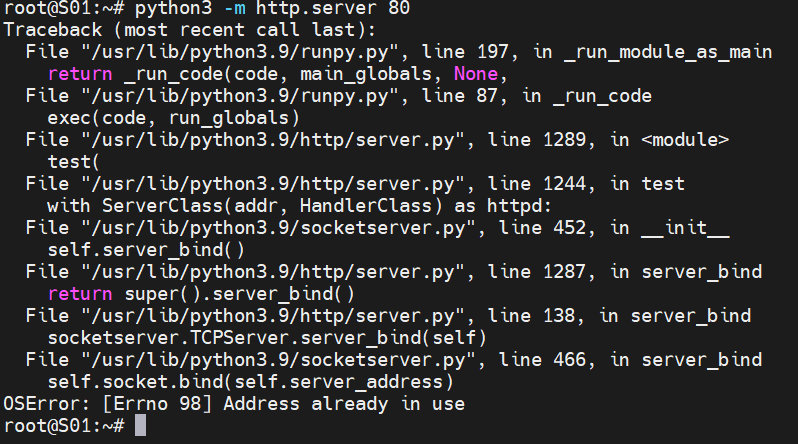
On your source system, now type python3 -m http.server to start up a temporary HTTP server on port 8000 for WGet to pull from. If the port is already in use and errors out, type the port after the command, as shown below.
![]()
Go to your destination system and go to a folder you want to import into, such as making a directory called /import then going into it. Run wget x.x.x.x:PORT/FILENAME.tgz, replacing the x's with your public or private IP, the PORT with the port it opened and the FILENAME with the tarball name.

You will see a progress bar with it transferring over. Once it's done, it will go back to the normal terminal line.

You can now go back to the source system and "Ctrl + C" to exit out of the webserver.

On your destination system, you can now do what you need to do on your tarball, such as move it to another place, extract it with tar -xvf FILENAME.tgz and more.

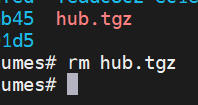
If the transfer was successful and the extraction also was successful, make sure you go onto the old source system and delete the old tarball, you don't want to fill up on disk space.
Cannot Access UDP Connected Games Due To OVH Firewall
If you have purchased an OVH system from one of their "GAME" series, such as the GAME-1, GAME-2 or the GAME-LE-x servers, you will need to login to their interface to disable the UDP firewall called the "Game Firewall" as this will block connections such as Minecraft Geyser.
This guide presumes that you've checked multiple port open sites and they all state closed, you checked and confirmed the port is open on the firewall internally on UFW or the IPTables rules and if running the Pterodactyl panel, you've confirmed that the port is assigned to the server itself and rebooted the container to confirm working.
Login to your OVH account and click the "Bare Metal Cloud" in the top left, click "Network" along the left hand sidebar then "IP" under the dropdown.


In the list, find your server IP and click the three dots on the right and click "Configure the GAME firewall". If you are unsure which server it is, click the blue text of the IP and it will jump you to that server to confirm it is the one you want to configure.


All you now need to do is click "Deactivating the restriction" along the top bar.

Wait about 2-5 minutes and it should be off. You are now able to connect to that IP with ports broadcasting UDP traffic, like Minecraft Geyser. If it still doesn't work, do it again, as in enabling and disabling it. It's super temperamental and needs it to happen more than 60% of the time!
Accessing A Website Or Control Panel Shows "Too Many Redirects" Error
If you see this error:

Go to CloudFlare and click your domain.

On the left hand side, expand SSL/TLS then click on "Overview".

Set the SSL/TLS encryption mode to "Full" instead of "Flexible".

Wait about 30 seconds for the change to propagate, then you should be able to access it again.
Error 1014 Tebex - CNAME Cross-User Banned
If you are ever presented with the following below when trying to access your Tebex store using your own custom domain, such as https://store.vanillaplus.uk, this means you need to renewal your Plus plan.

You haven't been banned or suspended by CloudFlare, even though the word "banned" appears. What this means in simple terms is when Tebex tries to redirect from your custom domain to the actual store link, they stop that redirection because you haven't renewed your "Plus" plan, so the CNAME becomes "Banned" to stop the "hop" from your custom domain to abc123abc123.tebex.io (The CNAME you made).
Hopefully this provides more context. All you need to do is go and pay. After about 5-10 minutes, the error disappears.
Why Is X Not Installed On The System - How Docker Images Work
When connecting to your systems via SSH, you may notice that certain applications don't exist, are not installed or not working as they should be. This is due to how docker works and it's image system.
If you are a client who has Pterodactyl installed, servers are managed in containers, which are managed by the software called "Docker". Each server is contained in a container, simply referred to as a "house." Those little houses live together to run anything you wish to in their own little "building". They can't talk to other "houses" (Unless internal, 172.18.0.1 or your own subnet), they can't interact with them, they can't touch them, they are separate. They can run a magnitude of software such as Java, NodeJS, Python, SteamCMD, the list goes on. Now, these are managed with docker images. Images are released by many users online to help streamline the process of running a certain application. For example, let's take a java one from Pterodactyl's repository on GHCR:
- ghcr.io/pterodactyl/yolks:java_17
What we can see here is that it's using the website ghcr.io, which is where people can share and publish docker images. Next up is /pterodactyl, which is the author of the images, then java_17, meaning that Java 17 will be installed into that container when deployed. Deploying means that you've gone to your panel, created a server, selected Java 17 as the image, and the "house" gets "built." Using this analogy should hopefully now make sense. Nothing is installed on the root level, doesn't touch the system whatsoever and doesn't interfere with other houses.
This means that when you run java --version, node -v or other such command, it won't show anything up unless we installed that application at some point for testing or development. Any questions, ask the team.
PHP Extensions Locations For .so Files
PHP stores its .so extension files in /usr/lib/php/ then the API version of PHP. For ease of use, they have been listed here as they are not listed on any site.
- PHP 8.0: 20200930
- PHP 8.1: 20210902
- PHP 8.2: 20220829
If you need it and you can't find it, run php -i | grep API and you will see the API number:

Installing Modules On cPanel For WHMCS - IonCube, FileInfo & Soap
IonCube
- Go to /opt/cpanel/ea-php81/root/usr/lib64/php/modules (PHP 8.1) and unzip the tar you download from here with the .so file. (The loaders from their website)
- Then in /opt/cpanel/ea-php81/root/etc/php.d (PHP 8.1) put nano 00-ioncube.ini and put in zend_extension = /opt/cpanel/ea-php81/root/usr/lib64/php/modules/ioncube_loader_lin_8.1.so
- Once done, you need to systemctl restart ea-php81-php-fpm.
Soap
- Copy the soap.so file from a normal PHP-8.1 install in the location /usr/lib/php/20210902 (PHP 8.1) and put it into /opt/cpanel/ea-php81/root/usr/lib64/php/modules (PHP 8.1).
- Then in /opt/cpanel/ea-php81/root/etc/php.d (PHP 8.1) put nano 00-soap.ini and put in extension=soap.so
- Once done, you need to systemctl restart ea-php81-php-fpm.
FileInfo
- Login to WHM (Not cPanel client side, WHM's admin side).
- Search for "Software" along the left side and find "EasyApache4".
- Click the button that says Customize next to Currently Installed Packages.
- Click PHP Extensions along the left hand side in blue (3rd option down).
- Search for Fileinfo in the search bar in the top left and click the toggle on the PHP-8.1 version.
- Click Review.
- After looking over the proposed changes, scroll to the bottom of the screen and click provision.
- Once done, you need to systemctl restart ea-php81-php-fpm in terminal.
Referenced from: https://support.cpanel.net/hc/en-us/articles/1500000107181-How-do-I-install-Fileinfo-
If you wish to install extensions for a user of cPanel but don't want to install these extensions globally, follow:
- Example below is for soap extension
- Go into that user with su in terminal or use the cPanel’s terminal page.
- Run pear, this will give you results. Run pear install Archive_Tar to install tar.
- Run pear install PEAR to install Pear required for SOAP to install. Ironic. Lmfao.
- Run pear install soap then install using the channel link.
- Note: You might need to use --force on some of the commands as the tar version of 1.4.14 breaks soap install.
Note: On all instances above, you can restart Apache's FPM in the WHM interface instead of the command by searching "Services" in the top left then finding "Apache FPM".
LiteSpeed WebServer With Pterodactyl (CyberPanel)
Setup main domain then “panel” as another subdomain. During the subdomain creation, make the location of the files /panel/public. Pull files from this directory back one into /panel and make sure Ptero's /public is the folder that CyberPanel is pointing to for it's VHost - This tricks CyberPanel into loading it.
Remember it's a laravel app, so you still need to install composer, run the composer install, sort out the database connections, fix the initial permissions from the Ptero docs, install redis and sort the pteroq service (including wings if adding it onto this system).
If you get error 500, click fix permissions in file location /panel and /panel/public in the CyberPanel files interface along the top.
Set .htaccess rules in the rewrite section of CyberPanel with:
RewriteEngine On
RewriteBase /
RewriteRule ^/index.php$ - [L]
RewriteCond %{REQUEST_FILENAME} !-f
RewriteCond %{REQUEST_FILENAME} !-d
RewriteRule . /index.php [L]
Note: If not added, the panel will just 404 as it cannot redirect .php files to friendly URL’s.
For wings, it will fail since firewalld is blocking the ports. Go and open the ports in /etc/firewalld/zones/public.xml and update the public zone. Then systemctl restart firewalld. You can also do this in the Firewall page of CyberPanel along the left hand side.
Searching Through Files - Finding A Particular String And Updating It
Main command: grep -rnw "xA" -e "xB" | xargs sed -i 's/xC/xD/'
- grep – Obvious, search to find results.
- -rnw – Search all directories after string definition.
- “xA” – Location to search.
- “xB” – String to search. Has to be in quotations!
- | - Pipe, put results from grep into sed.
- xargs – Call on argument from result.
- sed – Replace.
- 's/xC/xD/' – Replace string xC with xD.
If you see on the example below, you would use the grep command up to the pipe symbol first without -l, then add it in afterwards. This is used after searching for strings. The letter L is for grep’ing just the directory location where it finds the result and not actually showing file contents.
SED WILL NOT work if you do not add -l into the -rlnw. It has to require the absolute paths and not anything else it outputs.

An Example
Searching through LuckPerms configs in all servers to replace connection timeout string.
grep -rlnw "connection-timeout: 5000" */plugins/LuckPerms | xargs sed -i 's/connection-timeout: 5000/connection-timeout: 20000/'
Installing SQLite3 To SQL with Python3 Package To Convert SQL-Lite DB to MySQL for import
Start off with pip3 install sqlite3-to-mysql, making sure apt install python3-pip is installed. Once done, upgrade pip3 with pip3 install --upgrade pip then pip3 install packaging. You can now run sqlite3mysql --help.
For simple syntax, it is:
sqlite3mysql -f <file-of-sqllitedb.db> -d <database-to-import-to> -u <sql-user-to-import-with> -p
When I tried using -u root, it didn’t work and said access denied even with correct password. Use a SQL user which has access to that particular database or a global admin. No idea why.
Works fairly well and have had no reports of issues.
An example below:

ItemsAdder With CloudFlare Proxied Domain For IP Protection
- Create a proxy pass for the domain and add to CloudFlare.
- Cert it with LetsEncrypt and give the port to the server on the panel, like 20000.
- Update ItemsAdder with the details below and make all the other "host" types false.
- This texture pack option should fully deploy automatically, and the game should recognise it.
- If it doesn’t, open the MC log and see if it “Times out”, if it does, you’ve done a configuration wrong!
    self-host:
      enabled: true
      server-ip: https://texturepack.domain.com
      pack-port: 20000
      append-port: false
Get the “/dev/disk/by-id” information for FSTab from the udevadm command
To start with, you will need to use the disk name only without the partition name. When you go into /dev/disk/by-id and investigate the names, it will be named “part-1, part-2” etc at the end of the ID name. Ignore these for now. Do fdisk -l and get the disk name.

Run the below command:
udevadm info -q symlink --path=/sys/block/<DRIVE-NAME> | awk '{print "/dev/" $1}'


Repeat this command until you have “nvme-eui.ID” or "sci-ID" as the first time you run it, it may list the “by-path/” statement which isn't helpful or the actual “by-id/DISKNAME” which is what we want.
Once you've found the ID, go to /dev/disk/by-id and look for the partition you want from fdisk -l. Use this to correlate the lists together.


For example, /dev/sda3 is going to be "part-3" from the ID list.

DO NOT IGNORE THIS WARNING. IT IS CRUCIAL TO READ.
Note: Make sure you set the drive to ext4 before rebooting so it actually knows how to handle the partition. If you don't, the partition won't actually mount and when you reboot you will get put into initramfs, so have rescue mode on standby with a KVM!
Go into nano /etc/fstab and add the /dev/disk/by-id/IDNAME-PARTX into the FSTab. Example below for nvme0n1p1’s part 1, the partition for the datastore, ext4, defaults, 0, 1.

Resizing single volume group and logical volume after disk expansion
This guide is used after cloning to a increased size disk such as 500GB to 1TB, or by having some space left over from installing the OS, such as the rest of the disk but only 50GB allocated to the / partition.
Firstly run vgdisplay to get the volume group information.

Run lsblk and notice that the size of the partition on the disk and the volume group is 424G, not the 931.5G.
Note: After resizing, it will be a bit smaller than the disk as the other partitions take it up, so around 926G at the end

Let's add the rest of the free space to the partition first. Run cfdisk /dev/nvme#n1, replacing hashtag with drive number. No need for a partition here as we need to do changes on the disk itself.
I should have an image here of CF Disk at some point when I have a free size again.
Go down to partition 3 (Or where your logical volumes are stored for expansion) and chose "Resize". Just put in the amount you wish to add to that partition (which is presumably max), then write it.

![]()

Once you've done this, run pvresize /dev/nvme#n1p#, replacing both the hashtags respectively.

Next run lvextend -l +100%FREE /dev/vg#/LOCATION, replacing the hashtag with the volume group number, normally vg0, and location with the mountpoint name, normally "root". An example:
This will say resized. I don't have an image currently of this.

Once done, run resize2fs /dev/vg#/LOCATION, replacing the values again with the relevant fields.
This will say "online sizing required" and resize.

Run df -h and lsblk to confirm resizing.


Resizing a logical group then volume within a parented RAID number
Taken from https://packetpushers.net/blog/ubuntu-extend-your-default-lvm-space/
Run cat /proc/mdstat - Get the RAID partition you want to update after doing all the resize commands to switch from Raid 1 to Raid 0.


Next, get the partition info which should look like this with lsblk:

Notice how vg0-root and vg0-swap are sitting on on both disks partition 3 parented under RAID mdadm md127? This is what we will be working on.
Run vgdisplay - Get Volume Group name and the path, in this case will be "/dev/vg0/xxx". Sometimes it is "/dev/mapper/ubuntu–vg-ubuntu–lv", different on how the OS was installed.

Increasing the size now comes in 3 steps
1. We now need to physically resize the volume of the mdadm RAID by doing pvresize /dev/RAID# as shown below:

2. Expand the Logical Volume by running lvextend -l +100%FREE /dev/VGNAME/LVNAME. We worked out the VGNAME was vg0 and we worked out the LVNAME is root from lsblk - this showed us vg0-root. It should be successful.

3. Your final stage is doing the typical resize2fs /dev/VGNAME/LVNAME. You do NOT do it on the mdadm RAID#, as this will just fail with not finding the superblock:


Check with df -h, and you will see it has been resized successfully:

CloudFlare does not minify javascript correctly when working with Grafana
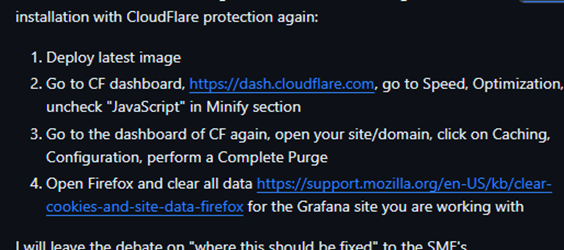
Speed > Optimisation > Content Optimisation.

Follow the below if you want to disable JavaScript Minify'ing for just that website, not the whole domain:

Install Custom Version Of MySQL Server
In this guide, replace .27 with what version you need. At time of writing, Version .37 is now out, but on and after .29 breaks games such as Unturned with their charsets.
To begin, download the bundle.
wget https://dev.mysql.com/get/Downloads/MySQL-8.0/mysql-server_8.0.27-1ubuntu20.04_amd64.deb-bundle.tarExtract it.
tar -xf mysql-server_8.0.27-1ubuntu20.04_amd64.deb-bundle.tarInstall LibSSL otherwise it will fail.
wget http://archive.ubuntu.com/ubuntu/pool/main/o/openssl/libssl1.1_1.1.1f-1ubuntu2_amd64.deb
sudo dpkg -i libssl1.1_1.1.1f-1ubuntu2_amd64.deb
Install Libaio1 (Lol - AIO 😋) otherwise it will fail.
wget http://archive.ubuntu.com/ubuntu/pool/main/liba/libaio/libaio1_0.3.110-5_amd64.deb
sudo dpkg -i libaio1_0.3.110-5_amd64.deb
Install MySQL common.
dpkg -i mysql-common_8.0.27-1ubuntu20.04_amd64.debWithout the above being done, it errors out stating it needs MySQL common. If you try to include the package (./mysql-common....) with apt install, this fails due to it being the "last" package it installs and fails to understand when to install it.
Finally, install MySQL.
apt install --yes --no-install-recommends ./mysql-community-client_8.0.27-1ubuntu20.04_amd64.deb ./mysql-community-client-core_8.0.27-1ubuntu20.04_amd64.deb ./mysql-community-client-plugins_8.0.27-1ubuntu20.04_amd64.deb ./mysql-server_8.0.27-1ubuntu20.04_amd64.deb ./mysql-community-server_8.0.27-1ubuntu20.04_amd64.deb ./mysql-client_8.0.27-1ubuntu20.04_amd64.deb ./mysql-community-server-core_8.0.27-1ubuntu20.04_amd64.debEnter root password for password authentication or leave blank to just run mysql and login with terminal.
Choose "Use Strong Password...", as you won't be needing 5.x compatibility. 
Complete. Run mysql.

Networking With Hetzner - With and Without additional MAC's configured
IP's have been redacted in this configuration but you can evaluate based on your operations.
With doing this in debian, reverting over to netplan and disabling networking has been so much easier. ChatGPT and other help articles from stack overflow has been a major help in understanding networking as a whole. systemctl stop networking && systemctl disable networking. Install netplan.io with apt install netplan.io.
Configure it then reboot the system. Do not presume it will work unless you restart.
If you just need the netplan configuration:
network:
  version: 2
  renderer: networkd
  ethernets:
    enp41s0: # Network interface name from "ip a".
      dhcp4: no  # Turn off DHCP.
      addresses:
        - 148.x.x.242/29  # IP Address 1 with subnet.
        - 144.x.x.121/27  # IP Address 2 with subnet.
      gateway4: 148.x.x.241  # The gateway of the first subnet.
      nameservers:
        addresses:
          - 8.8.4.4 # Obvious enough.
          - 8.8.8.8 # Obvious enough.
      routes:
        - to: 144.x.x.96/27 # The "Identifier IP" for the subnet. The one before the gateway and two before the first usable.
          via: 144.x.x.97 # The gateway of this subnet.
          metric: 100 # The higher the metric, the lower it is in priority (Yes, stupid) - It means if 240 fails, it will make 144 prioritized.
If you need to specify MAC addresses:
network:
  version: 2
  renderer: networkd
  ethernets:
    enp41s0: # Network interface name from "ip a".
      dhcp4: no # Turn off DHCP.
      addresses:
        - 148.x.x.242/29 # IP Address 1 with subnet.
        - 144.x.x.121/27 # IP Address 2 with subnet.
      macaddress: xx:xx:xx:xx:xx:xx  # Specify the MAC address for 148.x.x.242 ONLY (It has to route somewhere for remaining traffic).
      routes:
        - to: 144.x.x.96/27 # The "Identifier IP" for the subnet. The one before the gateway and two before the first usable.
          via: 144.x.x.97 # The gateway of this subnet.
          metric: 100 # The higher the metric, the lower it is in priority (Yes, stupid) - It means if 240 fails, it will make 144 prioritized.
        - to: 148.x.x.240/29 # The "Identifier IP" for the subnet. The one before the gateway and two before the first usable.
          via: 148.x.x.241 # The gateway of this subnet.
          metric: 0 # The higher the metric, the lower it is in priority (Yes, stupid) - Not applicable here - 0 meaning normal priority.

-----------------------------------------------------------------------------------------------
    # If using multiple interfaces, add them here with their respective MAC addresses
    enp41s0:1:
      dhcp4: no
      addresses:
        - 144.x.x.121/27
      macaddress: yy:yy:yy:yy:yy:yy  # MAC address for 144.x.x.121
Running Lancache & Another Webserver On Top
If you are running the software Lancache and need to run another webserver on top such as nginx with ports 80 and 443, you need to do some configuration changes by serving your virtual host files on the public IP address while your Lancache speaks on your private internal IP's to your dedicated systems/LAN network.
In this example, I will use Lancache on 10.10.10.50 and the public IP as 123.123.123.123. What we need to do first is configure Lancache with the following inside the .env file:

Once this has been configured, head into the docker-compose.yml and update the 80 and 443 ports to be bound onto that particular bind of private IP.

Once completed, start up Lancache first as it needs port 80 and 443 in use for the Monolithic container using docker-compose up. Check that it was successful, then Ctrl+C, then docker-compose up -d.
We've now configured Lancache to work on that private LAN IP address. For all your virtual host configuration files now for nginx, you just need to specify another private LAN IP, or the public IP if serving accessible websites (if you aren't using HAProxy).


You can now restart nginx and it will not complain that the port is already in use as you've done this neat hack.
Keep in mind that if you have software that updates the nginx vhost files automatically such as TenantOS or VirtFusion, please keep in mind that you will probably need to repeat this again on their updates.
Installing Debian/Ubuntu & Then Disk Unmounts - Debootstrap Error
You're here because you've landed yourself at the error below, stating that it could not find the codename for the release during an installation of Ubuntu or Debian. This is because the CD unmounted during your ISO install, so after provisioning the disks, it's no longer there and cannot continue. Follow below to fix it


Press enter/escape and head back onto the installer page, then going to "Execute a shell".

Press continue.

You're now in the BusyBox shell. Type "blkid" and find the CD drive. It's got the name of the ISO.

In this example, we can see it has the type iso9660, so we know that's the ISO, and the mount is /dev/sr2. Now simply mount it! mount /dev/sr2 /cdrom.
Make sure it's /cdrom as this is what the installer is looking for.
Type exit then press back on install.

Job done!

Break Into VirtFusion Software If Admin Password Is Lost
This will not be successful if you have lost the 2FA for the only administration user. The login will be changed to the new password and you can get into the first stage of the process, but you'll be sent to /tfa/verify, and if you don't have the 2FA code, you're outta luck.
This is useful for first time installations where you lost the login box that appears on final install or if you need to get into an administrator account in an emergency.
Go onto the Hypervisor Control server and create a python script below, like nano new-password.py. Update the password here line with your relevant new password.
import bcrypt

# Replace with the new password for Jasmine
password = "<PASSWORD-HERE>"

# Generate a bcrypt hash with cost factor 12
salt = bcrypt.gensalt(rounds=10)
hashed_password = bcrypt.hashpw(password.encode(), salt)

# Print the hash
print(hashed_password.decode())
Run the python script with python3 new-password.py. You should see it print it in bcrypt hash.

We now need to update the database. Run cat /opt/virtfusion/app/control/.env. We need the database name. Now head into MySQL, normally just being mysql in the terminal.

Type use <DB-NAME> you located earlier.

Run select * from users and you need to find the email you wish to update. 
In our example, we'll use Jasmine's email. Now run the following to fix the user:
UPDATE users
SET password = '<PASSWORD>'
WHERE email = '<EMAIL>';
This should be successful with no issues:

You can now login to VirtFusion normally using this new password. Make sure to clear any cookies before signing in. There's a potential that it will be caching any session you have, so also use incognito.