Do not follow this next section if you are **NOT** becoming a hosting company. This is where you send over what information you've compiled!
##### **Hosting Company** **Infrastructure Info:** - What do you have right now? Any dedicated systems? Any infrastrcture already in place? *(e.g. Proxmox node w/ VMs for Pterodactyl, SQL, Docker, etc.)* **Do not ignore this step if you already have systems. Make a diagram of *what* is *where*.** - Locations and specs of machines *(CPU, RAM, storage, network uplink?)* - Is this going to be rented or owned hardware, or a mix? - How are you planning to scale? *(e.g. Buying more dedicated systems at the beginning or later)* **Services You're Offering:** - Shared Game Hosting? *(Pterodactyl panel servers - Minecraft/Rust, etc.)* - VPS Hosting? *(Done on top of the dedicated systems ordered/separately.)* - Dedicated Servers? *(Owned hardware or renting out using a platform?)* - Website Hosting? *(Domains, Storage, Websites)* **Software & Stack:** - **Panels:** Pterodactylm Multicraft, VirtFusion, Proxmox, ESXi, TenantOS, Synergy CP? - **Billing System:** WHMCS, Blesta, WemX? **Networking & Security:** - **Shared Services:** Multiple Shared/Dedicated IP's? - **DDoS Protection:** Arbor, TCPShield, NeoProtect, Infinity Filter, Cosmic Guard? **Support & Automation:** - Are you doing support through Discord or another platform? Live Chat? WHMCS Support Tickets? **Brand & Legal:** - Company name, branding, domains bought? - Terms of Service, Privacy Policy, GDPR compliance completed? # Adding Domain Onto CloudFlare From Namecheap Login to Namecheap in the top right corner. If you have two factor, put it in.   Find the domain you wish to add and press the "Manage" button on the right.  Currently, the nameservers are pointing to Namecheap, meaning that all the DNS records for the domain have to be managed on their dashboard, meaning no protection is in place such as A records not being proxied, so we want to change them to CloudFlare's nameservers. Under the "Domain" tab along the top, locate the "Nameservers" dropdown box and click on "Custom DNS". In each box, put the two nameservers provided to you in **either** your **💬-comms-chat** or **from CloudFlare** itself, as you may of done the domain configuration yourself after going through the steps.Each account in CloudFlare has two separate nameservers provided to you when you add your first domain and will always be the same on each domain you add, so noting them down is a good idea but not really needed, just helpful if you are adding loads of domains at once. As an example, our account uses Earl and Samara. This isn't a security issue whatsoever as nameservers are searchable the same as any other DNS record, and don't tie to a single "account". If you lookup Earl for example, you will see 1000's of domains using that nameserver.
   Once put in, click the green tick top right. You'll get a success banner at the top stating it's been changed.Even though it states 48 hours, NS changes normally take 1-2 hours. These records are always persistent and more important than MX or A records for example so it **can** take up to 48 hours to change, unlike warnings on other registrar sites that state A records take 48 hours, they take less than 10 minutes normally.
 We will do the rest in terms of adding it to your account. If you haven't already, please make an account on CloudFlare and then add us as normal[ following the management guide.](https://docs.jasmeow.systems/books/onboarding/page/inviting-management-to-cloudflare) Once that's done, we will move your domain over.We are not "migrating" the domain to CloudFlare. That's not how nameservers work. This costs money, moving a domain from registrar to registrar, like GoDaddy to Namecheap. Think of nameservers as the phone book. When you lookup "google.com" in your browser, you go from your PC to the nameservers of the domain, which then "rings" up the registrar hosting your DNS, and they return your domain records. Using a A record, they provide your PC with an IP address which takes you to their site.
# Inviting Management To CloudFlare You will need to add us to your CloudFlare account so we can manage your DNS records and firewall rules accordingly. Head over to https://www.cloudflare.com/ and click "Log In" in the top right.  Login with your details and 2FA code if required.  You will be taken to a page that looks like the below. Do not click into one of your domains, stay on this screen. If you do click on a domain, click back by clicking the blue arrow just under the CloudFlare logo next to your domain name.   In the bottom left, click "Manage Account" then "Members" should automatically select.  Under the main members title, click the blue "**Invite members**" button. 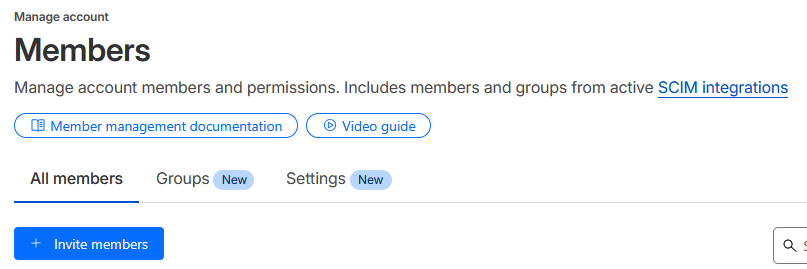 In the "Add email addresses" field, please type in **jasmine@jasmeow.systems** so I can be added. When you click the white "Add" button or hit enter, it will put it into a box underneath as shown below. Click "Create a policy" afterwards. 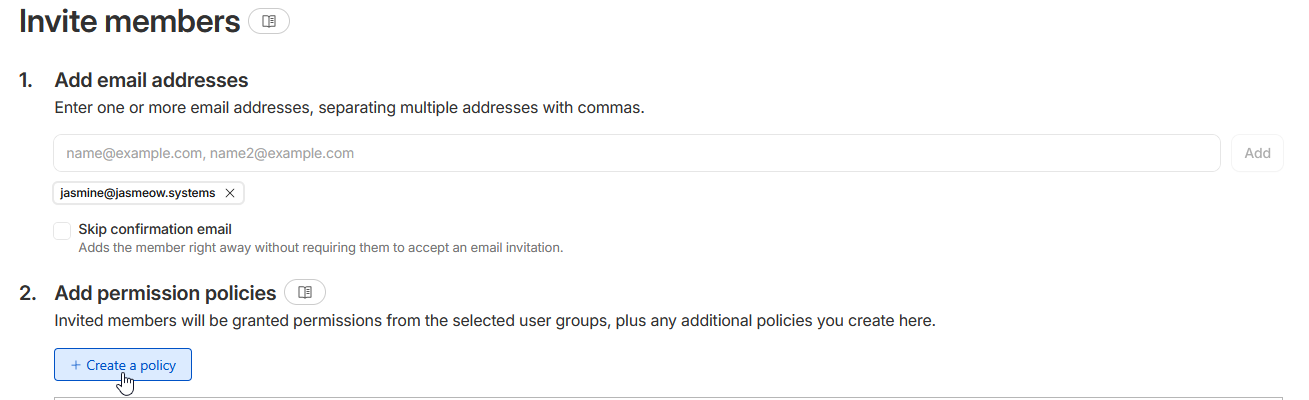 Select the scope to be "Account Level" which will be your network name or email address.Please select *"**Account Level**"* and not *"**Domain Level**".* We are not interested in the other domains on your account if they are not related to your business or network unless you tell us to modify them. You cannot invite us as Super Administrators if you do not do this.
Click the "Super Administrator - All Privileges" toggle. Click Create policy at the bottom. 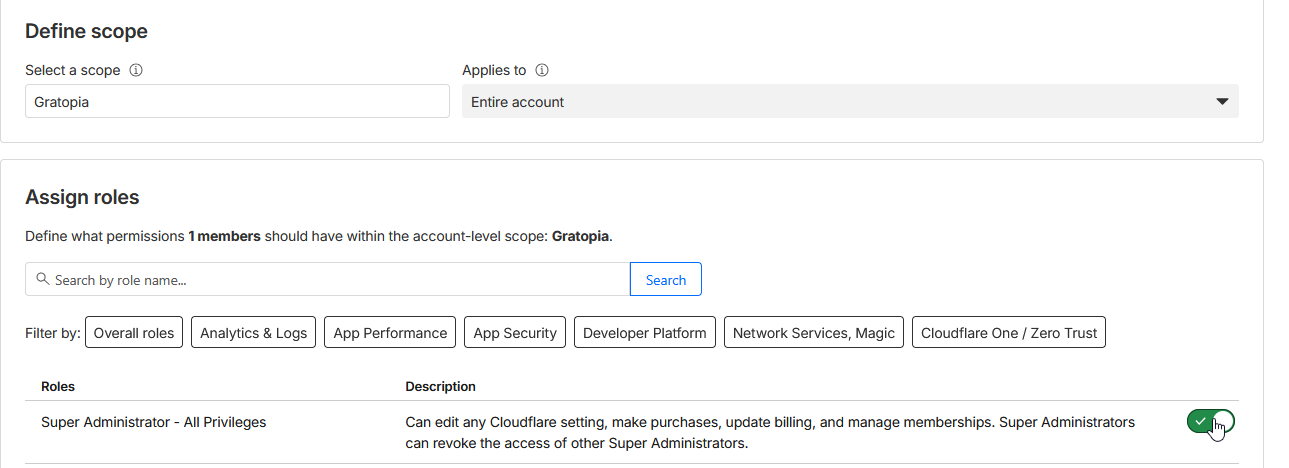 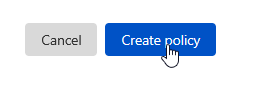Please invite us as *"Super Administrator - All Privileges"* and not anything else such as *"Administrator"* - This wastes time and proper setup where we need it in the future. We as a team aren't going to remove you and only the management team will need this role.
When we invite other system administrators to help on your network, we give them specific permissions for their job role. You don't need to worry about us changing your staff users or giving access where they shouldn't need it to other domains.
You will then be sent back to the invite members screen. Click the blue "Invite members" button.  You should see the email listed under the invite button as pending invite. [](https://docs.jasmeow.systems/uploads/images/gallery/2026-03/gqhyZnOpgK2bA75R-image.png) # HetrixTools Setup HetrixTools is the tool that we use to monitor your dedicated machines. It's designed to notify us about any faults that may occur and help us determine the issue quickly so we can get the issue fixed immediately. Head over to [https://hetrixtools.com/register](https://hetrixtools.com/register) and create an account with your information. Please use a randomly generated password as we will require this login to setup your dedicated systems. #####  After you have registered you need to confirm your email. Failing to do this will result in us not being able to configure monitoring on your systems. Once verified, provide us the login.  # Hosting Provider Access # Subuser Account Invitation For OVH Head over to your OVH domain where you have purchased your server from.Make sure you use the right domain where you purchased your dedicated system from as we will need this after you have created the subuser account. OVH's login systems don't share account credentials across their databases, so if you try to login to **ca** for example it won't work if you have a system bought on **us**.
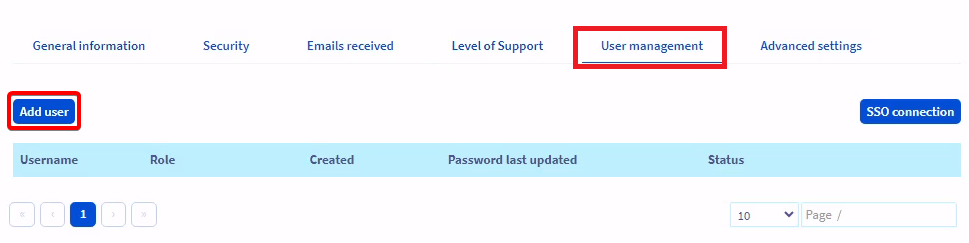
Login to your account using the My account or My customer account button situated on the header of the website.   To add someone as a subuser you will have to get to your Account Settings by clicking your name in the top right corner and then clicking on your profile picture as highlighted below.   Proceed to the User Management tab and follow the step below.**!! If user management is missing, please see this: **OVH has moved it to along the left side bar** >  >  > **
 Please use the provided information in your **💬-comms-chat** channel to create the subuser account and press confirm when done.Do not put the ID in the login box. Put the name of "Jasmine" into the box, otherwise our login becomes 29-xx/29-xx and not 29-xx/Jasmine.
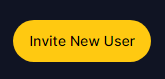
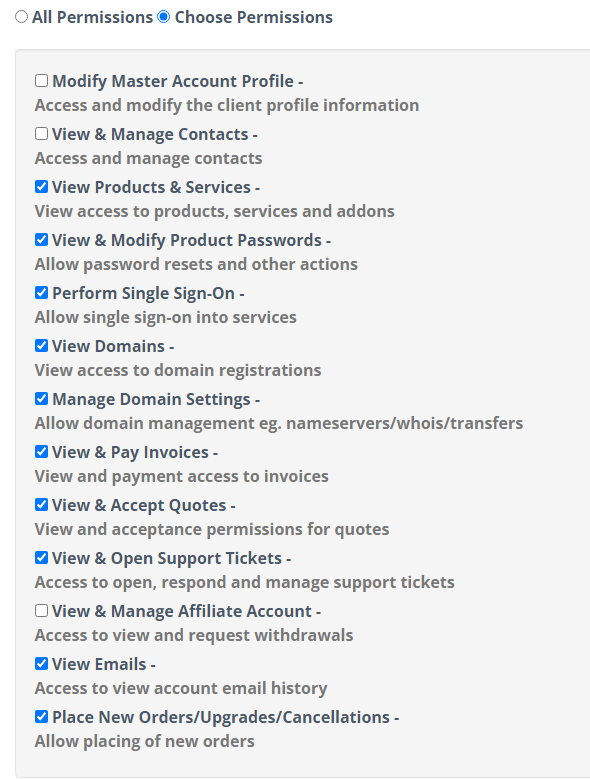
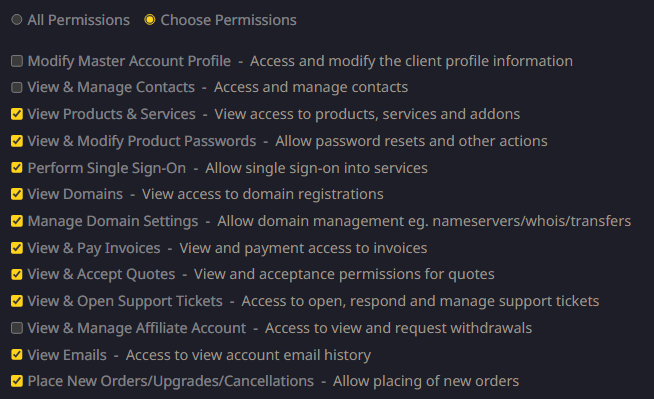
#### **You are not finished, please continue reading.** We need the ID + the URL to login. 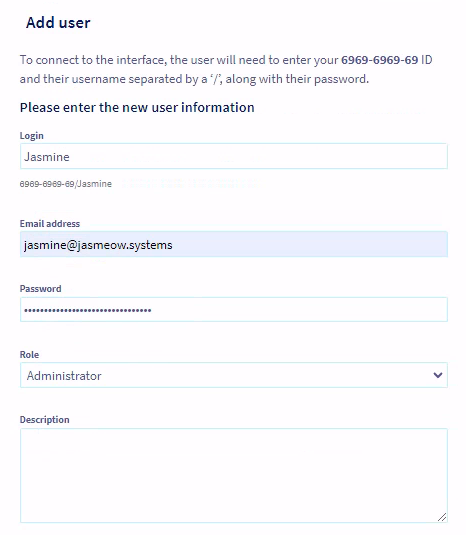 After creating the subuser account **please** send the **ID** that OVH gives you right after. If you see below, it states **Example: 6969-6969-69/Jasmine**. **PROVIDE** **THE ID.**  Additionally, make sure you inform us what domain it is, such as [https://ca.ovh.com](https://ca.ovh.com), [https://us.ovhcloud.com](https://us.ovhcloud.com), etc. They have around 7 different login pages. Get it from the address bar in the top left. **PROVIDE THE URL.**  # Subuser Account Invitation For Bloom.Host Head to Bloom.Host's website at [https://bloom.host/](https://bloom.host/) and login to their Billing Area in the top right.   In the top right corner, click your name, then in the dropdown, click "User Management".  Click "Invite New User" in yellow then put in our email [clientsystems@jasmeow.systems](mailto:clientsystems@jasmeow.systems) to add us. 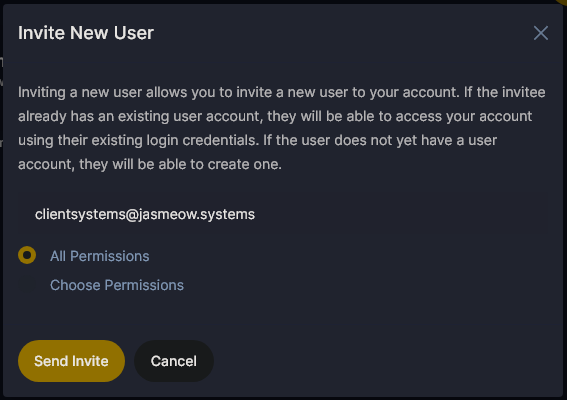 Please select all permissions, but if you want to limit access, we must at least have the following as we need to see the systems, complete product password resets, use single sign-on to access the control panels for the systems and opening or viewing current support tickets. The other ones are optional and domains are not required if you don't have them. If you do choose all permissions, we can add additional system administrators who might need to login as management can add them.We see your details in the billing area anyway such as name and address, so turning off the tick for modifying master account profile is slightly pointless as it says "Access" when this just means we can't change your name or details like that.
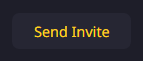
  Click "Send Invite" at the bottom. We are now added and can view your account.  # Subuser Account Invitation For Hosturly Head to Hosturly's website at [https://hosturly.com](https://hosturly.com) and click "Login" in the top right to go to their Billing Area.  [](https://docs.jasmeow.systems/uploads/images/gallery/2023-12/fMOyyLZMy20nBDNt-image.png) In the top right corner, click your name, then in the dropdown, click "User Management".  Click "Invite New User" in yellow then put in our email [clientsystems@jasmeow.systems](mailto:clientsystems@jasmeow.systems) to add us. 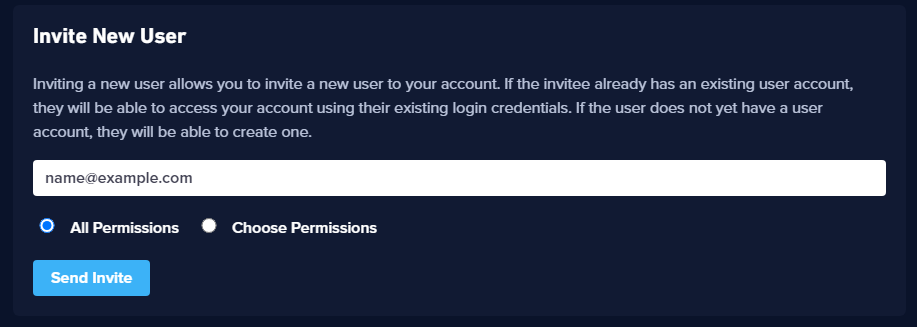 Please select all permissions, but if you want to limit access, we must at least have the following as we need to see the systems, complete product password resets, use single sign-on to access the control panels for the systems and opening or viewing current support tickets. The other ones are optional and domains are not required if you don't have them. If you do choose all permissions, we can add additional system administrators who might need to login as management can add them.We see your details in the billing area anyway such as name and address, so turning off the tick for modifying master account profile is slightly pointless as it says "Access" when this just means we can't change your name or details like that.
 Click "Send Invite" at the bottom. We are now added and can view your account.  # Subuser Account Invitation For PebbleHost Head to PebbleHost's website at [https://pebblehost.com/](https://pebblehost.com/) and login by hovering over "Panel Login" in the top right and clicking "Billing Panel".   In the top right corner, click your name, then in the dropdown, click "User Management".  Click "Invite New User" in yellow then put in our email [clientsystems@jasmeow.systems](mailto:clientsystems@jasmeow.systems) to add us. 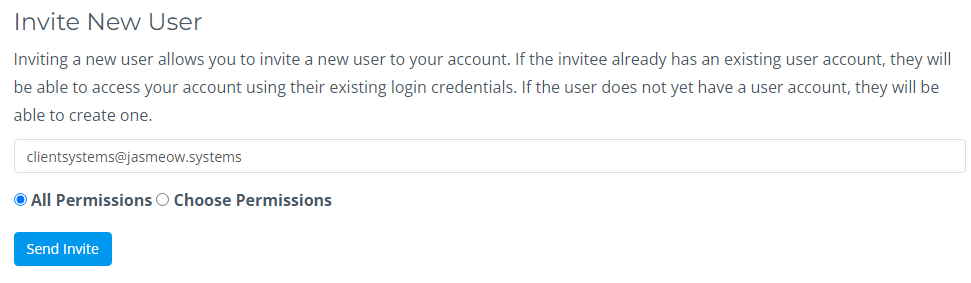 Please select all permissions, but if you want to limit access, we must at least have the following as we need to see the systems, complete product password resets, use single sign-on to access the control panels for the systems and opening or viewing current support tickets. The other ones are optional and domains are not required if you don't have them. If you do choose all permissions, we can add additional system administrators who might need to login as management can add them.We see your details in the billing area anyway such as name and address, so turning off the tick for modifying master account profile is slightly pointless as it says "Access" when this just means we can't change your name or details like that.
 Click "Send Invite" at the bottom. We are now added and can view your account.  # Subuser Account Invitation For SparkedHost Head to SparkedHost's website at [https://sparkedhost.com/](https://sparkedhost.com/) and click "Client Area" in the top right.  In the top right corner, click your name, then in the dropdown, click "User Management".  Click "Invite New User" in yellow then put in our email [clientsystems@jasmeow.systems ](mailto:clientsystems@jasmeow.systems)to add us. 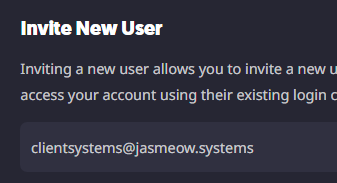 Please select all permissions, but if you want to limit access, we must at least have the following as we need to see the systems, complete product password resets, use single sign-on to access the control panels for the systems and opening or viewing current support tickets. The other ones are optional and domains are not required if you don't have them. If you do choose all permissions, we can add additional system administrators who might need to login as management can add them.We see your details in the billing area anyway such as name and address, so turning off the tick for modifying master account profile is slightly pointless as it says "Access" when this just means we can't change your name or details like that.
 Click "Send Invite" at the bottom. We are now added and can view your account.