Advanced Procedures & Issue Diagnostics
Contains advanced documentation and solutions to issues for your panel not commonly needed.
- Updating Panel To Latest Version (v1.12.1)
- Adding Additional Application Versions To Existing Eggs
- Wings Daemon Causing Containers To Null Route Or Can't Reach Internet
- Containers Stopping/Crashing Due To Memory/Process Limit Reached
- Changing The Panel Domain For Pterodactyl
- Understanding The Node Values - The Disk & RAM Information
- Getting Rid Of The “Invalid Java Version” Popup In Pterodactyl
- Disabling The Too Large Directory "First 250 Files" Limiter
Updating Panel To Latest Version (v1.12.1)
This guide will inform you how to update your panel to the latest version of Pterodactyl. The current version is v1.12.1. You can return to this guide to run the same commands again when the panel is updated.
Panel Update Procedure
Do not continue if you have custom addons, themes or other features installed on the panel. This will remove them and return the panel to the default state. This is your warning, and if not adhered to, there's no return unless you have a backup of your panel.
Login to your VPS/Dedicated server where your panel is hosted. We first will make a backup just in case we mess up anything. Run the commands below to make a full backup of the current live panel.
cd /var/www
tar -zcvf panel-before-upgrade.tgz pterodactyl
We will now begin the update. Navigate to your panel's web directory, which is /var/www/pterodactyl.
cd /var/www/pterodactyl
Run the command below to begin the update.
php artisan p:upgradeThe first question that is asked whether to download the latest archived version from Pterodactyl's GitHub store. Before typing yes, make sure it goes to the github.com/pterodactyl/panel/...etc link, as shown below.

The upgrade system will then state that the webserver user & group should be www-data. If it is not picked up the right one, type no and then update it like the below. Do the same for the "Your webserver group..." as well.


Finally, it will ask if you would like to being the upgrade process. Type yes.

The upgrade system will then continue and fill the screen with the process of upgrading of the new panel, set its permissions and other important steps. Once it's half way through, it will pause and ask you if you would like to run the migration the databases with new updated information. Type yes.


The panel upgrade is now complete.
Wings Update Procedure
To upgrade wings, which is the daemon which runs the servers, copy the commands below on all your nodes which are linked to your panel.
systemctl stop wings
curl -L -o /usr/local/bin/wings https://github.com/pterodactyl/wings/releases/latest/download/wings_linux_amd64
chmod u+x /usr/local/bin/wings
systemctl restart wings
Your wings update is now complete.
Adding Additional Application Versions To Existing Eggs
Note when doing this: If you update your panel and use the commands from the pterodactyl documentation, your changes to the default eggs will be overwritten. You can ignore the command php artisan migrate --seed --force to prevent this but this isn't recommended on panel updates. The main suggestion here is to make nnew eggs for your custom changes.
This does not remove the installed version on a server, just hides it again from the dropdown for the selected docker image.
In this example we will add Java 22 and 23 to the Minecraft Paper egg. Firstly, head on over to Admin > Nests > Click the egg. Look a few sections down and you'll see "Docker Images". In here, make a new line above/below where you want it to appear, and continue reading.

The format of Docker Images to show in the dropdown is NAME PIPE SYMBOL IMAGE SOURCE. For example, Java 23|ghcr.io/ptero-eggs/yolks:java_23. You can normally find the image source from https://ghcr.io/ptero-eggs/yolks and finding the right one you require. Let's go find Java 23. Click the URL above and then "View all tagged versions".

Ctrl + F and find the one you need. Search "java_23" or "java_" and you'll find it. Keep in mind there's many pages so you'll need to keep looking, such as node_ might be on page 3.


As we've searched here, it has the name java_23. If you click on the blue text of the image you need, copy the ghcr.io/... section after the FROM.

Now paste this into the panel, put the Name at the front followed by a Pipe Symbol, and you're done.

This will now appear under servers with that egg under "Startup" tab.

Wings Daemon Causing Containers To Null Route Or Can't Reach Internet
Sometimes the wings daemon doesn't pass along route configuration properly to the docker containers which in turn break DNS and access for plugins to the outside internet. There are two solutions you can try, one is minor and the other is major, dependent on your infrastructure.
Run nano /etc/pterodactyl/config.yml and find the DNS entries under the docker header.
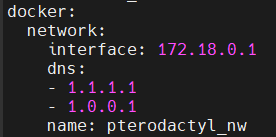
You will notice that the DNS entries are set to CloudFlare, and this is normally the case on every system. We will need to set these to Google, 8.8.8.8 and 8.8.4.4. CloudFlare is not always better in every case and can actually cause DNS problems on software not routed through their CDN's.

Save the file, Ctrl + X, Y then Enter. Restart wings with systemctl restart wings.
Start/restart your server and see if you have the same problem. If you still are experiencing a connection issue, try the solution below.
This is dangerous to do on a hosted client node, such as a hosting company with multiple clients accessing their servers. It's relatively fine if it's just one client with a managed dedicated system, but don't always use this solution as a "go-to" and say job done. It's basically setting the internal networking for docker to the host and not pterodactyl's internal adapter, which can cause plugins to maliciously break out into the root system and containers to speak to the root system which is disabled by default.
Nano back into the wings configuration file and change the network mode under the docker section to "host" instead of "pterodactyl_nw".

Restart wings using the same command. The issue will be permanently resolved as it's using the root systems network and configuration. Still not working? Reach out to one of the system administrators.
Containers Stopping/Crashing Due To Memory/Process Limit Reached
You might be running into this error when running a large MC network or have a server which has many plugins, players and operations going on at the same time.
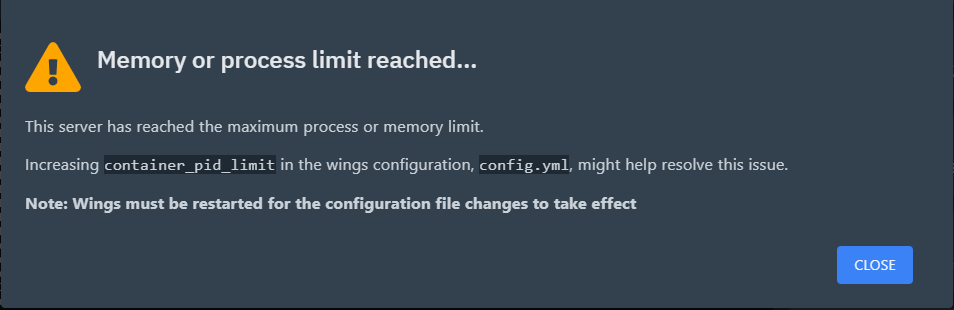
Pterodactyl is running on a Linux OS, which has "PID's". PID means Process ID, and what happens is your server(s) are using more than 512 processes, causing said container to stop, crash or not start up at all. Windows operates the same way and has it's own process ID's for each application. Open Task Manager, go to the "Details" tab and you will see "PID" next to each service.

By default, Pterodactyl Wings, the daemon, is set to 512 PID's, which to us is really daft. It's secure for a reason, as remember, Pterodactyl is mainly written for hosting companies. This is done just in case you have a client who decides to crash or stop a node from running efficiently by tar bombs, PID limits or RAM exploits.
The problem is, this causes an annoyance for networks as it's your own dedicated system and you shouldn't be bothered by this error. At Jasmeow.Systems, we set this to -1 by default to stop this from happening in the future. If you are running your own system however, SSH into the system and go to nano /etc/pterodactyl/config.yml and scroll down to find:

Change the number to -1.

Ctrl + X, Y then enter to come out of nano. Then run systemctl restart wings.

That's it. Your servers won't do this anymore.
Changing The Panel Domain For Pterodactyl
This guide will be using CloudFlare with nginx installed on the server, with the record proxied using port 8443 for the daemon and SFTP requiring an IP connection instead of the hostname. If this doesn't make sense, ask.
Login to your DNS and firstly update the A record to what you wish it to be. For example, I am changing the domain from manage. to panel.

Then SSH into your system and go to /etc/nginx/sites-enabled and update the pterodactyl.conf with your new domain. Easiest way is by nano'ing into it, doing Ctrl + \ (Backslash), typing in "manage." then replacing with "panel." like I did below in the GIF. I then did Ctrl + X, Y then Enter.

Your next step is restarting nginx, systemctl restart nginx. Now head into /var/www/pterodactyl and update the .env file with the new domain under the APP_URL option.

Now head to your panel, in our case panel.jasmeow.systems and login with the same credentials you had previously, everything is the same. Go to the Admin side > Nodes > Click the node > Settings tab. Update the domain in the FQDN box as shown below, make sure your daemon port is 8443 (Or one of the CloudFlare's HTTPS ports) and click "Save Changes" in the bottom right.


Head to the configuration tab and click Generate Token. Pop back into SSH and paste it in, allowing the overwrite.


Restart wings with systemctl restart wings - You are all done and wings should now come back online with a green heart. Not come online? Check the status of wings and solve the error or reach out for assistance.

Understanding The Node Values - The Disk & RAM Information
Pterodactyl panel was written with hosting companies in mind and not for just the average consumer, so a lot of the panel has admin side only additions which aren't used unless you are a host and API integrations with software like WHMCS modules which support such checks.
If you go to the Admin Side > Nodes > Click the node, you will see the following two information boards on the right hand side. You might be thinking "What? How's that 250 million billion whatever value? Isn't there only 500GB disk and 128GB RAM?"

You are correct, but the value can be modified to whatever number you wish. These values are not automatic, and you set these values when you create the node for the first time, or under the "Settings" tab on the top bar then "Allocation Limits" on the right.

Typically, people set this to unlimited, like a billion for example as you see here as it is your own dedicated system. As long as you watch the system resources in SSH such as free -h, df -h and other commands, you will have no issues and you can even setup remote monitoring like HetrixTools pings to monitor the resource levels. The value is a dummy value. Go nuts, set it to what you wish within reason and watch your limits in other ways. The panel does not care what you set this to as a personal user as it won't stop you making servers or starting them manually, it's for limiting creations of servers via the API as explained below.
For a hosting company however, they use billing systems such as WHMCS and with the server module addon "Pterodactyl" or "PteroBill" which automatically creates the server on bill payment by the customer and makes them an account. Now, with these modules, they do API calls to check the node for available space, RAM and allocations before making the server just in case it has no room left. This is where you would set these values to a reasonable amount such as 128GB RAM (131072 MB) so when your billing system allocates a server, you don't run out of room for future customers, over allocating and worrying about degraded performance.
A common misconception is that you should never over allocate as a hosting company. Over allocating is not bad as long as you manage it well. For example, Jasmine has a host herself and set her nodes to unlimited also, but she has many systems in place to warn her of over allocation and usage limits. Think about it, a client isn't going to need all 12GB 24/7 and will idle around 3-4GB when not in use, so allocating 3 servers in that 12GB space is perfectly fine. This applies to CPU also so setting the limit to 200% for 2 whole cores is fine. That server will use all 2 cores on boot but then idle around 20-30%.
As a host running WHMCS, you will meet the error "There are no nodes to satisfy the request" every now and again, meaning that this is basically telling you "A node I am trying to use has run out of something, please check, I cannot auto create a server for this customer." Go check the Disk and RAM values for the node in question including confirming there is enough allocations available.
Getting Rid Of The “Invalid Java Version” Popup In Pterodactyl
Simple config line.
nano /var/www/pterodactyl/resources/scripts/components/server/features/JavaVersionModalFeature.tsx
Delete all const MATCH_ERRORS and enter whatever for the last line and put a comma, like the below for an example.

Save, rebuild panel using ptero's community "build the panel assets" doc.
https://pterodactyl.io/community/customization/panel.html
Disabling The Too Large Directory "First 250 Files" Limiter
By default, the panel limits any directory on a server container to 250 files and folders at any given time in a single view. This is done to improve page loading performance, but can be majorly inconvenient for hosting companies or for networks with large file collections stored in flat format.
Go into /var/www/pterodactyl and edit the following file:
cd /var/www/pterodactyl
nano resources/scripts/components/server/files/FileManagerContainer.tsx
Locate the following code:
<div>
    {files.length > 250 && (
        <div css={tw`rounded bg-yellow-400 mb-px p-3`}>
            <p css={tw`text-yellow-900 text-sm text-center`}>
                This directory is too large to display in the browser, limiting the output
                to the first 250 files.
            </p>
        </div>
    )}
    {sortFiles(files.slice(0, 250)).map((file) => (
        <FileObjectRow key={file.key} file={file} />
    ))}
    <MassActionsBar />
</div>
Replace it with:
<div>
    {sortFiles(files).map((file) => (
        <FileObjectRow key={file.key} file={file} />
    ))}
    <MassActionsBar />
</div>
You can also simply update the code at  and at
  to be a higher number, so the limiter is still in effect. Make sure to update the reason it displays to not confuse clients or other staff members.
Build the panel assets from the following Pterodactyl guide - https://pterodactyl.io/community/customization/panel.html
Once done, you should see the directory no longer have the yellow banner along the top.