Pterodactyl Guides
Need some assistance managing your game panel? Follow these pages for assistance on a variety of topics.
- Pterodactyl Terminology - What Do The Terms Mean?
- Typical Pterodactyl Errors In Console & Solving Them
- Getting A Containers UUID
- Moving Files & Folders Around The Container
- Adding Additional Ports To Your Pterodactyl Nodes
- Creating A New Server Container On The Panel
- Adding A Server To Your Proxy
- Configuring A Standalone Plugin To Access A MySQL/MariaDB Database
- Configuring Centralised Plugins For Linked Database Access
- IP Aliasing On Your Panel For Staff Members
- Updating CPU, Disk, RAM & Startup Parameters For A Container
- Using Schedules On The Panel For Restarts & Events
- Being An Owner Of A Server & How To Change
- Problems With Plugins Accessing Databases
- Inviting Additional Staff Members To Your Control Panel
- Changing Docker Containers Images For Your Servers
- Adding New Games & Services To Pterodactyl With Nests
- Advanced Procedures & Issue Diagnostics
- Updating Panel To Latest Version (v1.12.1)
- Adding Additional Application Versions To Existing Eggs
- Wings Daemon Causing Containers To Null Route Or Can't Reach Internet
- Containers Stopping/Crashing Due To Memory/Process Limit Reached
- Changing The Panel Domain For Pterodactyl
- Understanding The Node Values - The Disk & RAM Information
- Getting Rid Of The “Invalid Java Version” Popup In Pterodactyl
- Disabling The Too Large Directory "First 250 Files" Limiter
Pterodactyl Terminology - What Do The Terms Mean?
Sometimes the panel can be really confusing when understanding the terminology, so I have included the list below, with some easy to understand statements at the end of each bullet point to gain more understanding of how the application works.
- Panel — This refers to Pterodactyl Panel itself, and is what allows you to add additional nodes and servers to the system. Written in ReactJS and Laravel. Obvious enough!
- Node — A node is a physical machine (dedicated or VPS) that runs an instance of Wings. Dedicated systems you buy from a provider.
- Wings — The a service written in Go that interfaces with Docker and the Panel to provide secure access for controlling servers via the Panel. The guy that does the talking between panel and docker.
- Server — A server refers to a running instance that is created by the panel. These servers are created on nodes, and you can have multiple servers per node. One small house.
- Allocations - Allocations are ports which you assign to the servers. For example, 25565 for the BungeeCord server for a proxy or MC server, then another "allocation" for Bedrock, 19132. Basically ports given to a container.
- Docker — Docker is a platform that lets you separate the application from your infrastructure into isolated, secure containers. A city of houses.
- Container — Each server will be running inside an isolated container to enforce hardware limitations (such as CPU and RAM) and avoid any interference between servers on one node. These are created by Docker. Again, the same one small house.
- Docker Image — A Docker image contains everything needed to run a containerized application. (e.g. Java for a Minecraft Server). Operating systems like Windows.
- Nest — Each nest is usually used as a specific game or service, for example: Minecraft, Teamspeak or Terraria and can contain many eggs. Multiple categories.
- Egg — Each egg is usually used to store the configuration of a specific type of game, for example: Vanilla, Spigot or Bungeecord for Minecraft. Select the "gamemode" of the game/service from the Nest chosen.
Typical Pterodactyl Errors In Console & Solving Them
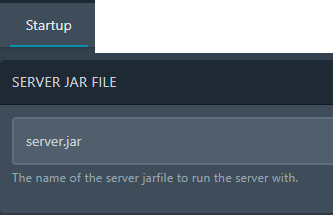
"Unable to access jarfile xxx.jar"
Use. Common. Sense. This is the most irritating one we get asked literally every day. No, your server didn't crash, it didn't break, it didn't blow up. Read the error. It is clearly asking that it cannot find the jar file on start up. If you see the start up line just before it states the error, you can see in my example it is called "server.jar". We need to change this. Go to the "Startup" tab along the top and update the jar file name. Your file called "BungeeCord.jar"? Put that in there and start the server again. Note: CaSe SeNSiTiVe.

"Cannot find module './index.js'"
Same as above, the file doesn't exist. It could be located in /src/index.js for example, and if it is, you need to go to the Startup tab and update that parameter in the Main File section.


"Exception in thread "main"..."
This error is usually caused by selecting the wrong Java version for the docker container. For example, you put on a Paper 1.8 jar but the server is using docker image Java 17. Normally the panel or jar file will be smart and explicitly state "Oi, wrong version, update it" but some jar files can't do that or haven't got that built in. Another reason for the below is due to a corrupt server jar so download a new one from the site you got it from or use a different one if it is broken.

"bind: cannot assign requested address"
Big scary red error but actually a very simple one - Your dedicated system has IP's and to manage them they use something called network adapters. If none of the adapters has the address specified, it won't "bind", as in, "I can't see it, did you type the number right?". For example, 1.1.1.1 would not ever exist on your system, so you can see where it states tcp4 1.1.1.1, meaning it cannot find that particular IP. Normally happens if you have multiple IP's you ordered from your hosting provider, tried to use one on the panel, but forgot that you need to ip addr add or netplan them first on the system. Ask us for assistance if you are adding additional IP's as this can get confusing with networking very quickly. The rest of the error is just the server UUID and a bunch of waffle.

"bind: address already in use"
If I have a server or service using the same port, it will state this error. Very obvious to solve - Find what is using that port and stop it, turn it off, or change your current servers port to something else. Might require use to investigate if the local system has locked up that port and is actually available. 
"Invalid maximum heap size: -Xmx0M"
This is due to setting your "Allocated Memory" RAM limit on your panel to 0 and have the variable flag -Xmx{{SERVER_MEMORY}}M included in your start up command. Basically, the panel states "Setting this to 0 will allow unlimited memory in a container" but Java doesn't work like this and if the line exists, it means that it will try and use maximum RAM of 0. The panel was recently updated within the past year to remove this -Xmx line and only have the -Xms (minimum) due to the poor wording and confusion this had with not so technically minded users of the panel. Now when you set it to 0, it will really use all the memory it can get for the container, so normally you use Aikar flags to make the RAM -Xms8G -Xmx8G for example.


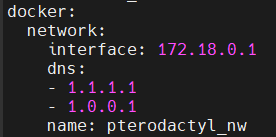
"daemon: network pterodactyl_nw not found."
EXTREMELY rare. Reinstall docker using the standardized docker commands from Pterodactyl's website and then start the container again. Still failing? Pull the latest wings configuration from the node and update it, then restart wings. Ask us to solve this problem for more troubleshooting.

"NODE_MODULE_VERSION xxx. This version requires higher/lower..."

This means that you have the wrong NodeJS version selected on the Startup tab, needing to switch to a higher version. You can find them here - https://nodejs.org/en/download/releases

Getting A Containers UUID
When asking for support and your panel contains more than one server, it speeds up our assistance by providing which server UUID is effected with the issue. You can find them in many places, see below:
Note, there is the short UUID and long UUID. Both of these can be provided as the short one is mostly always unique and never matches another, but if it does, provide the long one. For this guide, we will be using S for short and L for long at the beginning of UUID.
For example:
ce823922 AND ce823922-2f7a-4425-a0d9-7c5cc2e2242b
Client Side
1. Click a server on your panel and look at the URL at the top of your browser in the address bar. It's https://yourpanel.com/server/SUUID

2. Click the "Settings" tab in any server along the top and find "Server ID" (LUUID) in the bottom left. You can click it to copy!


![]()
3. On the server, click the arrow next to the "Activity" tab. You can locate the LUUID on the 3rd line of the Information table.


Admin Side
1. Go to the admin side and click "Servers" on the left. All the LUUID's are listed.


2. Click a server name in blue and the LUUID appears on the 3rd line of the Information table.
3. Click "Nodes" along the left hand side, click the node you want on the blue text, click the "Servers" tab and find the SUUID in the "Process Manager" table on the left.


Moving Files & Folders Around The Container
Pterodactyl does not have documentation on moving files and folders around the container you are in as it believes you already have the knowledge as you were the one that installed the panel in the first place, as in, knowing Linux commands. The trouble is, most panel installs are done by system admins or our team directly, so this unfortunately doesn't get informed. In simple terms, we need to learn what ../, ., and what a directory means.
A directory is a folder. It's a term used in Linux but also Windows, but the term is used for more computer proficient users. In a Linux system, in the root/beginning/start location, like the C:\ drive on Windows, there are directories which run the system, such as /root /var /srv /home and more. See below for an example.

In Pterodactyl, your servers are stored in /var/lib/pterodactyl/volumes. You might be thinking "Wait, var is variable files? That doesn't make sense?" Well, it includes directories such as /var/lib for MySQL/MariaDB or MongoDB storage and /var/www for website files like the Ptero panel. You've got to see it as These are variable > They change > Hence the name. You are storing data in them that will change by the user or the program using them.
Now, in Pterodactyl, each server is contained as a UUID, which is explained here, see below:

Now, in the panel itself, these are mounted as /home/container, if you check under the File Manager, you'll see this. You can't go further "back" from /home/container such as /home or even /, so this area is your root, your beginning, your start. When we start moving things soon, you will soon realise we can't go back any further.

The main relative path operand we use is ../. We call this dot dot slash, easy to say, simple to do. For example, if I was in /root and I wanted to move the file called steve.txt to /srv, I would do mv /root/steve.txt /srv. Now, that might be very confusing at first, but basically the command mv means Move. We can go and see that file with cd /srv which will take us to that directory and it means Change Directory. Doing ls will list all the items in that directory, showing us the steve.txt.
 >
> 
(~ means root in this context don't worry about it, but you can see we moved it in /srv.)
If you were using the other relative path operand, ., mostly just called dot, you are telling it to move here/come here. So, if I was in /root and I wanted to move /srv/steve.txt to me, I would do cd /root, then mv /srv/steve.txt .. That dot means it "put it where I am" essentially.
Now, how do we apply this knowledge to the panel? Well, let's say we wanted to move data from a folder named Server 1 and put it into the root of the container, so we can start the server with that data.
Now onto actually doing it!
The panel automatically does mv when pressing the move button, but where does ../ come into play? Well, when we want to move a file or folder backwards, we do ../ at the front. Each time we do it, it moves back another directory. Watch below:
Watch the New Location: at the bottom of the box. This will really help nail it first time!

You'll also notice that to move something back into a folder, we go to the front, and pop in where it needs to go. When knowing that ../ goes back, and typing the name goes forward, you've now mastered moving your server files around!
Adding Additional Ports To Your Pterodactyl Nodes
Head over to your Pterodactyl panel and go to the admin side which is the button in the top right corner, a cog icon.

Click on "Nodes" along the left hand side.

In the node list, click on the blue text. Normally, you will only have one node called "S01" for Server 01, but choose which one you want to add an allocation to.

Click "Allocation" along the top bar.

In the allocation table, you will see on the right a "Assign New Allocations" header.

- For the IP Address, if you want it externally, put in the external IP. Only do this if you are setting up the proxy for external player connections or voting incoming connections. Alternatively, you would do this if you are making another server such as a modpack server from Forge/Fabric, as this won't be able to connect to your proxy normally and has to be a standalone server. This is normally done for you so you shouldn't need to worry about it. In most cases, you will put 172.18.0.1 as this is internal, and would be used for internal proxying of players, votifier forwardings, dynmap redirections for vhost nginx redirects and so fourth. You would also use an internal IP for internal services such as hosting a Discord bot as that doesn't need external connections inwards but only outwards.
- For the IP Alias, this is helpful for disguising the external or internal IP's on the normal panel side if some of your staff are not administrators so that helpers/moderators/developers don't see the backend IP address or internal ones causing a potential breach if shared.

- For the Ports, choose wisely and follow an order to save time later on. For example, we do 172.18.0.1 as the IP and 25566-25575 as the ports, as we can then use the 10 internals for Hub, Survival, etc and the public IP on port 25565 for the proxy to prevent proxy spoofing. For other services like bots, we just put them somewhere where they aren't going to be clashing with future projects, such as on ports 4000, 5000, etc.
When using more than one dedicated system, the IP Address can be different, dependent on your network infrastructure, so ask the team before continuing if you are confused. For example, your internal networking could be 10.10.10.1 to 10.10.10.5, each dedicated system being an IP in that range.
In our case, we did 10.10.10.1 with alias "DiscordBot" to hide from non admins on port 3000. We click the green "Submit" button.

If you get the this error, Make sure you choose a port over 1024 as these are restricted to root level access only.

If you get either below error, make sure you actually filled out an IP in the IP Address box or a port in the Ports box!


If successful, you will get the below success message.

You can delete an allocation by clicking the red bin icon in the allocations table on the left.


You can also bulk remove them by ticking them along the left, then scrolling back up to the top and clicking "Mass Actions" top right, and pressing "Delete."


Now when you go to "Servers" on the left sidebar and "Create New" on the top right, you can now select which node to use and your port will appear there.


Adding ports to existing servers
Go to the Admin Side > Servers > Click a server > Build Configuration.

In the bottom right, there is a section called "Allocation Management". Each option is self explanatory.

Creating A New Server Container On The Panel
To make a new server, you first need to make the allocation for it if you haven't already. Read the previous page first to do that before following this guide.
Head over to your Pterodactyl panel and go to the admin side which is the button in the top right corner, a cog icon.
Go to "Servers" on the left sidebar and "Create New" on the top right.
Core Details
Server Name is self explanatory. Call it the name of your server.

Description can be left blank but if filled in, it appears on the panel under the server name in grey:


Server Owner is the email address of the user you want to "Assign" the server to. Normally just put my name "Jasmine" and choose my email address. The user owning the server doesn't do anything in particular in the panel, just have to click the toggle switch on the client side of the panel if you assign it under you which is annoying sometimes.


Allocation Management
If you've already made your allocation, you can select it here and carry on. If not, go follow that allocation guide. If no ports are available and it's greyed out, you need to go and make one first otherwise the server can't be made.

Application Feature Limits
Remember that this is your own panel so you can set these values to be whatever you wish and even change them later with no issues.
- Database Limit - You can set to around 10.
- Allocation Limit - Put 0. It's not needed and we can always add more ports later.
- Backup Limit - Leave them as 0 unless you want to generate a quick backup on the panel.

Resource Management
As stated previously, this is your own panel, you can set the limits now and change them later on. Don't limit yourself just because you should. You can overallocate and still run your network as it should be as you brought the system, you have control!
- CPU Limit - Leave it 0. If you read the guide below the box, it states each CPU core is 100%, so leaving it 0 will use all the cores it can when booting a server or running it.
- CPU Pinning - Unless you want to arrange maybe Proxy to cores 1-2, Survival to cores 3-4 for example, leave blank as it's really not needed unless you are advanced.
- Memory - It's in multiples of 1024, binary. Don't Google search "5GB in MB"! If you put a non binary number, it will look strange on the panel as it's coded with binary in mind.
- Swap - Leave 0. You don't need to modify it. Swap is disabled on all systems we manage as it is not efficient for what it's worth and its overhead is a massive headache to manage.
- Disk Space - Same formatting as memory, binary formatted. For example, want 20GB? 20480. 50GB? 51200. 1024 times X (X being amount) equals the amount in MB.
- Block IO Weight - Do. Not. Touch. This is very advanced and should only be modified by system administrators when required for your docker containers. You've been warned.
- Enable OOM Killer - Pointless, leave ticked off. You are not a hosting company so it's not needed and if it's on it will just kill the container and leave you with a headache.

Nest Configuration
You select which category you need and which image you want to get setup on the panel. For example, we are using the Minecraft category and the Paper egg as this is for our survival server.
- Nest - The Pterodactyl term for the categories, such as "Minecraft" or "Discord".
- Egg - The different container images docker can deploy onto the panel, such as "Paper".
- Skip Egg Install Script - Leave it off. Not needed for most creations of servers.

This next part you can skip as these options can be changed at a later date. We would recommend scrolling to the bottom of the page and pressing "Create Server".
Docker Configuration
This will normally be a drop down with the different images you can deploy. For Minecraft, Select which Java version you need, such as 1.8 needing Java 8 and 1.20.1 needing Java 17.

Startup Command
This is where you add your Aikar flags if need be. You can do this later in the settings of the server.

Service Variables
These are entirely dependent on the egg that you choose. For now, change them if you wish or leave them as they are, nothing will change and you can still make your server.

Head to the bottom of the page and click "Create Server".
If this fails, it will jump to the top of the page and show a warning with what's missing. In this case, the memory field was left blank, so we did 8192, 8GB of RAM.

If successful, you will see the below message.

To head to the client side of the panel, click this arrow along the top bar or click the servers icon next to your name in the top right corner.


Any questions, speak to one of the team.
Adding A Server To Your Proxy
When using BungeeCord or Velocity, you will need to connect your internal servers to your Proxy server before you are able to connect to them using /server servername, with different ways to do this as some changes are dependent on the versions you allow your players to join on.
Remember, this applies to the "forks" of these proxies also, such as Waterfall for BungeeCord. The steps are the exact same to complete. Start with the "Both Proxies" section, then move onto the relevant section you need.
Don't know which proxy you're running?
Go to the "Startup" tab on the proxy and you will see the jarfile name which is the proxy type. This name can be "waterfall.jar" but actually something completely different as people are lazy and rename the file and not the start up box name, but it is rare so just check with the command bungee or ver in the console.


Both Proxies:
Click a server on the panel that you are wanting to configure for accessing over the proxy and go to "Files" along the top. Find the "server.properties" file and click on it.

Find the line "online-mode=true" and change it to false. You set this to offline mode as the backend server won't be reachable when it's online as the proxy does the authentication to Mojang. If this was left on, you would be hitting Mojang twice, breaking your connection essentially.

Save the file with Ctrl +S, or by pressing save in the bottom right. CONTINUE READING FURTHER.
BungeeCord:
This type of proxy is the easiest to configure. Go to the "spigot.yml" file on the same server and update the "bungeecord: false" line to true, saving the file afterwards.


Go to the proxy server and open the "config.yml" file.

Copy the server above and paste it below, like this:

Update the details as required. Update the server name before the colon, such as "Survival:", the address as the one shown on the panel and the MOTD. An example is below:


Make sure to update your priorities with which servers should be connected to. In our case, we have "Lobby" and "Survival" able to be connected to if either one goes offline.

Reboot your proxy to apply the changes. If you don't reboot, you won't be able to join. Do note this will kick everyone on the network so do it during low peak downtime or maintenance.
Velocity - 1.13+:
For MC networks who would like players to connect with versions 1.13 or above only need to complete the following. Versions 1.12 and below will not be able to join even if you have installed ViaVersion and its additional addons, ViaBackwards and ViaRewind.
Head to your Velocity proxy and open the "velocity.toml" file, finding the line "player-info-forwarding-mode". Set this to "modern" to allow the correct versions. If you look above this option, it tells you the explanation for each of the different forwarding modes.

A little bit further down, you will see the forwarding secret file line. Leave this as it is, we will be going to that file shortly.

Further down, locate the [servers] header and input the backend servers you have on your network, with the name, a equals sign, then the IP in quotations with the port. An example is below.

Go further down and locate the "try" line. Make sure to update it with your "lobby" and any others to try and connect to first when they connect to the proxy. In this case below, if lobby is offline, players can still get to survival. You can see how it's formatted with quotations, a comma, a space then another quotations field of the next server, surrounded in brackets.

Save the configuration and open the "forwarding.secret" file in the same proxy server. Copy that code as we will need to go and put it into our backend servers now.

Head to your first backend server and:
- For 1.19 servers and above, go to the config folder > paper-global.yml.
- For anything below, find the paper.yml in the root directory.
Reason for the above differences is because of the below when you update from 1.18 and below to 1.19:

Search this file with Ctrl +F and finding "velocity" should take you here. Update both lines to true (unless you are running a cracked server then leave online-mode to false) and the secret in the apostrophes.


Reboot both the proxy and the the server to apply. You will need to do this on all backend servers, repeat the exact same steps with the forwarding secret key. If you don't do this, you'll be kicked with failing to authenticate.

Configuring A Standalone Plugin To Access A MySQL/MariaDB Database
Plugins such as CoreProtect, GadgetsMenu and more ideally should have their information stored in databases as this is far more efficient and less prone to corruption than SQLLite files.
If you have ever seen "Data is malformed" error from a plugin spamming the console (Normally CoreProtect) this means that you didn't safely shutdown the server and corrupted the SQLLite file, and will need to delete it to start again from scratch, possibly losing over 50GB+ worth of /co i history, causing a huge headache for you and your server admins meaning that griefers have the upper hand.
For each plugin, make a different database. Don't merge them together as it makes organisation a headache later on down the line when you want to migrate to a new system and tables are merged. You may also cause conflicts when the table names are the same such as different CoreProtect servers, as the prefix is always co_, so linking your Hub and Survival together would cause data mismatches due to them both using the co_block table.
It is better to organise databases by location, such as:
- LuckPerms = Global = Proxy
- CoreProtect = One Server = Survival
For this example tutorial, we will be using LuckPerms.
Pick a server on your panel and go to the "Databases" tab. Here, in the bottom right corner, you will have "New Database". Click this and name it "luckperms", then click "Create Database".


Go to the File Manager > Plugins > LuckPerms > config.yml. Scroll down and firstly set the server name to what server you are going to be configuring the the plugin on. For example, "Proxy".

In the storage-method variable, set it to "MariaDB" from H2 to start linking to the database.

Scroll down a bit more and find the address. Replace with 172.18.0.1 as the IP and some plugins require "3306" as a colon next to the IP, some have a dedicated option for the port such as Port: 3306.

Right click the tab with "Duplicate" then you will have one tab which has the configuration file open on it, and the other one you can click back to the Databases tab on the panel.


Copy the database name by clicking it on the panel, in our case, s2_luckperms, and then putting it into the config. Repeat the same for the username. For the password, click the eye symbol and you will see the password to also put into the config.


You can now save it with Ctrl + S or the "Save Content" button.

You can now restart the server and it will link successfully to the database.

Configuring Centralised Plugins For Linked Database Access
Plugins such as LiteBans and LuckPerms need to use the same database to communicate their information across all your servers successfully. There are many benefits to doing this rather than:
- Keeping your permissions in a flat file as they won't sync across all servers. This causes confusion for server owners with many ranks, having to remake them each time.
- Bans just being stored on one server so when they connect back through the Bungee network, they can join other servers, just not the one you banned them on!
For each plugin, make a different database. Don't merge them together as it makes organisation a headache later on down the line when you want to migrate to a new system and tables are merged. You may also cause conflicts when the table names are the same such as different CoreProtect servers, as the prefix is always co_, so linking your Hub and Survival together would cause data mismatches due to them both using the co_block table.
Firstly, Pick a server on your panel and go to the "Databases" tab. Create a database for the plugin name. I would recommend making this database on the proxy as it's better to organise databases by location, such as:
- LuckPerms = Global = Proxy
- CoreProtect = One Server = Survival
For this example tutorial, we will be using LuckPerms. The same process applies to other global plugins.
Go to the File Manager > Plugins > LuckPerms > config.yml. Scroll down and firstly set the server name to "Proxy" or "Bungee" so LuckPerms knows it's the proxy.
In the storage-method variable, set it to "MariaDB" from H2 to start linking to the database.
Scroll down a bit more and find the address. Replace with 172.18.0.1 as the IP and some plugins require "3306" as a colon next to the IP, some have a dedicated option for the port such as Port: 3306.
Right click the tab with "Duplicate" then you will have one tab which has the configuration file open on it, and the other one you can click back to the Databases tab on the panel.
Copy the database name by clicking it on the panel, in our case, s2_luckperms, and then putting it into the config. Repeat the same for the username. For the password, click the eye symbol and you will see the password to also put into the config.
You can now save it with Ctrl + S or the "Save Content" button.
You can now restart the server and it will link successfully to the database.
For the other servers, basically copy and paste the host, database, username and password onto your clipboard, pop onto the next server, and just edit the server name and storage-method. For example, let's go to the Hub. We need to rename the server to "Hub", set the storage-method to "MariaDB" then paste in our database information from the proxy, or you can follow the duplicate tab > click and paste method above, whichever is easier for you.


Provided an example GIF below of how you can simply just copy and paste the details over.

Restart the server and it will link to the same database!
IP Aliasing On Your Panel For Staff Members
If you run a Minecraft network where you have additional staff such as moderators, administrators or developers who access the control panel, you may want to think about IP Aliasing to hide particular IP's on the panel, such as your public IP, so it's not immediately visible to them.
For ease of convenience as we know server owners want to hide the IP address, we normally name the Public IP "Players-External", internal ports "Players-Internal", voting port on the proxy "Voting-External" and voting ports internally with proxy forwarding turned on "Voting-Internal". Additional allocations like "DiscordBot", "Servername-Dynmap" and others are included, dependent on your configuration.
We have written some warnings to go over beforehand so we solve any common FAQ's or confusion immediately.
Pterodactyl themes, addons or anything additional to the panel may not honor these IP Alias changes, such as hiding them, modifying them, or simply outright ignoring them, so that the IP gets exposed anyway.
Remember, this feature is entirely cosmetic and no configuration changes occur to effect players joining, ports being open or even hiding the ports which the server is assigned to, as these are always visible.
If you go to the "Network" tab of the server, be aware that if you've only changed one allocation but forgot another, this will expose the IP address. Triple check and confirm all is hidden with all ports ideally having IP Alias's to save headaches later down the line.
If you provide an account with administrator access in the panel, they can simply click on this button on the server page to see the IP address, rendering this masking very unnecessary. They can also go to the admin side of the panel > Nodes > Click The Node > Allocations.
SFTP is only operational over IP and not hostname if you are configured with CloudFlare proxying anyway, so your results with masking said IP address with Aliasing may vary, including becoming more of a chore for you than it is for a malicious staff member. Plugins also may expose the external IP address in their configuration files such as GeyserMC's Standalone proxy system, as shown below:
Now that's all out the way, please follow these simple steps.
To setup an IP Aliasing, go to the admin side of the panel > Nodes > Click the node you want in blue > Click the "Allocation" tab.

See the middle column? Type any custom text in these boxes and it will show on the client side of the panel, such as Players-External. While you type, the box turns green which means it has been saved.

Now when you come out of admin, the custom text appears and not the IP, being completely disguised.


Updating CPU, Disk, RAM & Startup Parameters For A Container
Updating values for your containers so they have more CPU for starting up or running, more RAM for Minecraft or Storage for a plugin is very simple to do.
You will need to make sure your account is an Admin as you won't be able to modify these values otherwise. You can tell if you are admin or not by the gear in the top right.
To change any of these values, head to your panel and click on the server you want to modify. For example, we can see that Earth Survival is nearing its storage limit on the container, 226.56GB out of 250GB, so we will pick this one to change and update. The same process applies to CPU%, RAM or other settings.
![]()

Click on the box with the arrow along the top bar next to the "Activity" button then click on "Build Configuration."


You can also go to Admin > Servers > Click The Server > Build Configuration.
CPU
Unless you are a hosting company, leaving this at 0 is perfectly fine. You want your servers to use all the performance they can get and setting this to a value such as 200 will just limit you to 2 cores. Leave on 0 unless you really want to limit servers.

RAM
IMPORTANT NOTE: If you use Akair flags, the RAM will not be modified. For example, if you have -Xms8G (Minimum) and -Xmx8G (Maximum), this means your server will stay stable at 8-8.5GB and not change, even if you change the below value. Go to the "Startup" tab in either the Admin side or normal side and check.
RAM is calculated in binary, 1024. When calculating how much RAM you want, do the value you want times 1024, such as 200GB x 1024 = 204800. Make sure you do binary and not 1000 as it will look daft in the panel, like the below:


Disk
Disk is calculated in binary, the same as the RAM. Examples are below:


Once you've changed the values you needed to change, click "Update Build Configuration" in the bottom right hand corner.


Reboot your server for the changes to take effect. If you forget, the docker container will not update to the new information you have provided. For example, 250GB still instead of our new value, 300GB.
The panel will update the values on the interface as it is connected to the database, but the container has not received the new parameters yet until a container restart. Please do so at a convenient time.


Using Schedules On The Panel For Restarts & Events
Head to your panel and click on the server that you need to make the schedule for then click on the "Schedules" tab along the top bar.

Create a new schedule in the bottom right.

In this window, give the schedule a name, such as "Restart Server". Next, we need to set the time it will restart using the Cronjob syntax. Not sure what this is? In Windows, you might be aware of a tool called "Task Scheduler", and in Linux it's called "Cronjob/Crontab's", basically the exact same system. To schedule a time, you write it in a way of x x x x x, looking like this in terminal:

This means I want my script to run at 1AM each day. The 0 means at the minute 0, the 1 means at 1AM, the first * means to run every day of the month, the second * means every month and the third * means to run every day of the week.
- Show Cheatsheet - This is helpful to look at common schedule times or you can use a Cronjob calculator to work out what time you want your schedule to run at https://crontab.guru/
- Only When Server Is Online - Only complete the schedule when the server is in a running state, useful for stopping a restart schedule if the server is off for maintenance, causing it boot back up again and possibly causing headache.
- Schedule Enabled - Obvious enough! Turn on and off the schedule so it doesn't run.

This next part gets a little confusing, so please read in depth and don't presume anything, causing an unfortunate mistake. If you have any questions, don't hesitate to ask.
If you click into the schedule after creating it, you will see the below. You will notice three buttons. Edit, which allows you to change the schedule name and when it runs, New Task which adds tasks onto the schedule for them to run in what order of how they are created with delays if specified, and the Delete button in the bottom right to bin the schedule. Click on "New Task".

You will see the below screen, with the "Action" drop down having three options, Send Command, Send Power Action and Create Backup. These options should be relatively easy to understand, with the power action option changing the Payload section to "Stop, Start, Restart and Kill" options.
For the Time Offset, you set how long after each task it should wait before running it, such as 10 seconds. This will run the schedule at 1AM for example and run the first task immediately, but the next task set to 10 seconds will run 10 seconds later.
Remember, Time Offset is the time from the PREVIOUS task, NOT the FIRST task. For example, an announcement for a keyall, then 10 seconds later the keyall, and finally 5 seconds later a save-all, would be 0, 10, 5, not 0, 10, 15. It's 5 seconds after the previous task, not 15 seconds, accidentally thinking it begins from the first task in the schedule. If you go to the bottom of this documentation, it has an example for a server restart and announcements.
The "Continue On Failure" option is turned on when the task does not run successfully but continues onto the next tasks in the schedule. This is useful for if you programmed the broadcast command but your server actually uses sendbroadcast for example. Normally leave this toggled off so you can find out why your schedule did not run unless you are certain everything is correct.

Click "Create Task" in the bottom right. You are now done unless you need to add additional tasks.
An example is provided below basically explaining how to setup an announcement for a reboot of a Minecraft server for 60, 30 10 and 5 second broadcasts, then a restart command.
For example, I have an MC server that needs rebooting at 1AM but I want to announce in chat that the server is going down in 60 seconds, 30 seconds, 10 seconds and 5 seconds. After these announcements, reboot the server.
To do this, I would:
- put the first "Action" as Send Command...
- With the "Time Offset" being 0...
- And the "Payload" being broadcast &e&lReboot in &6&l60 &e&lseconds!
And press "Create Task". I would repeat the same steps for each message, putting the Time Offset as 0, 30, 20, 5, 5. If you think about it, you are sending the announcements at 0, 30, 20 and 5 seconds after each other of the previous, and 5 seconds after the previous announcement, you are restarting. It looks like the below:

You can click on "Run Now" in the bottom right to test your schedule and see if it runs successfully. If it runs with no problems, you are good to leave it running and come back to amend later if need be.
If you run into an issue where your schedule is stuck on "Processing" with a spinning circle, but not actually doing anything, this is due to a service called Pteroq not running properly. This is responsible for running email sending to subusers or reset password requests, schedule timings and other database related tasks. Let us know and we will connect into your system which is hosting the panel and run systemctl restart pteroq.
Being An Owner Of A Server & How To Change
In Pterodactyl, you may notice that servers are owned by you or another individual, such as one of our team. The good news is that this means absolutely nothing for you directly and you need to remember that the panel is built for a hosting company in mind, so "ownership" of a server actually means that the "client", aka the "user" is the owner of said server. Let's take this panel as an example:

If we go to Admin > Servers, we can see that the Owner is me, Jasmine. Now, what this essentially means is that I don't need subuser permissions to access any feature of that server, such as schedules, stopping and starting it, backups, file manager, etc, like you set by going to the Client side > Click a server > Users > New User > Click the permissions.

This also applies to the toggle switch in the top right on the main client side page, shown here:

You can see that with the toggle set to Showing others' servers, my servers vanish and aren't viewable. This is because I don't have anymore servers on my panel, but if one was assigned to a different user, they would be visible in the toggle.
To clear up any misconceptions of the interface. This does not mean the user who "owns" your servers OWN your servers (ironic sentence), it's a visual feature that applies to hosting providers, or if you rented from one, you would be the "owner" of that server, and you invite "subusers" to your server.
If you are an administrator of the panel, denoted by the star next to the users email in Admin Side > Users, you have access to ALL the servers AND permissions anyway, so whoever owns the server is pointless. Pterodactyl has to have an owner to a container (a server), no matter who it is.
Let's take this example. You are removing a previous developer who was a "owner" of a server and you want to take it back from them. If they are administrator, doing this is pointless, so remove their star first by going to Admin Side > Users > Click the user > Bottom right: then saving with "Update User" in the bottom left. 

They still have access to that server as they are "owner" of that server, still keeping in mind the panel is like a hosting company, so you need to "nick" it back.
Go to the Users page again and find your email.

Once you've done that, head on over to Servers above Users on the left hand sidebar and click a server name in blue. Head to the "Details" tab along the top. Find "Server Owner" and update the email by typing it in. Once done, click "Update Details" in the bottom left.


You've now become owner of that said server.
Remember: Being an owner of a container (a server in this case for simplicity sake) does not mean they can do anything malicious, neither do they "own" or "lock you out" of anything. The only action this stops you from doing is if you wish to remove their user on the panel, you must first assign all servers to a different user, such as yourself, before deleting them in Admin Side > Users > Click the user > Delete user. You'll notice the button is grayed out until they've all been moved.

Problems With Plugins Accessing Databases
If you get an error like the below with your plugins connecting to databases:
Remember, all plugins display errors in different ways, such as LuckPerms below, but will fill the console with a few lines of errors to tell you it failed to link to the SQL database if you configured the plugin to use one.

Unfortunately, this is mostly always due to you entering the wrong endpoint IP address into the configuration file of said plugin. It can also be username and password being incorrect but it is normally the port not being open to the database host, either configured internally or not open on another system.
For your databases to work correctly, ensure that the plugins host/IP address is pointing to “172.18.0.1” in its config.yml file. The configuration file might be named differently for your plugin, but the action is the same. Make sure it is not “localhost” or “127.0.0.1” as it shows in the database creation panel, shown below.
All your servers sit in individual houses called docker containers, separated from each other. They cannot see outside themselves to the main internal system, root level. Docker, the system which makes these houses creates a private network adapter with the IP address “172.18.0.1” to all containers internally, so they all link together and know how to interact with one another. This makes them speak on this number to access the databases living on “127.0.0.1”. Think of it as a bridge linking two cities together.
Make sure not to make this mistake when creating databases in the panel and getting errors such as “Connection timed out”, "Communications link failure" and "timeout after 10000ms" in the console.


Another most common reason for plugins not accessing databases on the panel is because your systems are running UFW, which is unified firewall. At Jasmeow.Systems, we configure this appropriately with additional rules for security purposes but if 3306 is not allowed internally on your own system, the following rules can be added:
# Allows Votifier Ports
ufw allow in on pterodactyl0 to 172.18.0.1 port 40001:40010 proto tcp
# Allows MC Ports
ufw allow in on pterodactyl0 to 172.18.0.1 port 25566:25580 proto tcp
# Allows Redis
ufw allow in on pterodactyl0 to 172.18.0.1 port 6379 proto tcp
# Allows MongoDB
ufw allow in on pterodactyl0 to 172.18.0.1 port 27017 proto tcp
# Allows MySQL
ufw allow in on pterodactyl0 to 172.18.0.1 port 3306 proto tcp
Any questions, reach out to management.
Inviting Additional Staff Members To Your Control Panel
For additional staff such as Developers and Administrators, you can invite them to each server with their own permissions using the Subusers feature of Pterodactyl.
Click into any server and click the "Users" tab. Click "New User" and put in their email into the top box.


For permissions, you can tick which ones they should have access to. They all have descriptions of what each one does so it's pretty self explanatory.
Some clients have requested if it is possible to disallow downloading of files but still allow edits, SFTP and other features but unfortunately this isn't possible in the current builds of the panel. This is due to this very annoying permission and it's description on the end of it. -

At the bottom of the permissions page, there is "Invite User". This will send the user an email to make an account on the panel then access the servers you've given them access to. You do this for all the other servers on the panel.

Admin Users
Do not continue with this section unless you have a secondary owner, trusted developer or one of our team. They can simply update any startup parameters on the servers, delete servers in 5 seconds and more. Ask us if you are unsure before granting them full administrator.
In the top right corner, click the cog for the Admin side of the panel.

On the left, click "Users".

Click on a users email.

On the right, click the Administrator drop down and change it to "Yes". On the left, click "Update User". They are now admin users and can access all the servers and all the settings.


Changing Docker Containers Images For Your Servers
Pterodactyl runs all servers in containers using software called Docker. Docker uses a system called "images" which helps manage what a server needs to run, like virtual operating systems. These images can contain any application that is needed to be used to run the container, such as Java 8, 11, 16, 17 and more for Minecraft. When adding additional "Eggs" onto the panel on the admin side under "Nests", you can bring additional images onto the panel such as "NodeJS" for Discord bots, so it will download all the NPM packages needed for a normal bot with node modules.
When you click into a server, go to the "Startup" tab. In here, you can change the docker image which will be used to start up your server. For example, you can switch on a MC server from Java 8 to Java 17.

If you see an error like the below for example:

This means that you have the wrong NodeJS version selected on the Startup tab, needing to switch to a higher version. You can find them here - https://nodejs.org/en/download/releases
Adding New Games & Services To Pterodactyl With Nests
Go to your panel and head to the admin side.

Click "Nests" bottom left.

You will see the following list. These are the default Eggs supplied with the panel when installed for the first time or restored after deletion when you update the panel. This is the reason why the red warning states don't edit the default Eggs as you will lose the changes.

In this example, we want to add the Discord bot eggs, mainly NodeJS for starters as this is the most common bot language. In the top right, click "Create New":

Give a name and description. An example is below, click Save in the bottom right when done.


We now need to go and get our Egg file JSON from either:
- The Pterodactyl default Eggs Github. This is where you can find eggs for all sorts of supported games and services - Link.
- Your download from a forum site such as BuiltByBit in the zip file or other website hosting the raw JSON code you can copy and paste into a notepad and save it.
As we are doing a Discord NodeJS Egg in our example, we will go to Parker's default Pterodactyl Eggs and find Generic > NodeJS > egg-node-js-generic.json.

Click on it then in the top left click "Raw".

Do Ctrl + A > Ctrl + C to select all of the text, then open up Notepad and paste it in with Ctrl + V.

Top right, press File > Save As then in the popup window, change the Save as type: to All Files.

Give the file a name and put .json on the end of it.

Save, close Notepad and go back to Pterodactyl.
To import the Egg into the Nest for the panel to run the game or service properly, click "Import Egg" in the top left.

In the popup, select the Egg file JSON on your computer and then select the Nest we made earlier, clicking "Import" once done.


Once imported, you will see the below success message and the Egg title:

When you now go to make a server on the panel under Servers > Create New, you will now see under the "Nest Configuration" section your newly created Nest and its Eggs you imported.

For already existing servers, go to Servers > Click the server you want > Startup tab. Under the "Service Configuration" header you can then select the Nest & Egg.

Do note that if you do change the egg on an existing server, this will "rebuild" it, downloading the latest container image and running its script ready for use on next start, possibly making you lose data. Use with caution.
If you see below, when you change the Egg, the Startup Command doesn't update but the Egg shows the Default Service Start Command. Make sure you copy the default line into the Startup command box if you are switching Eggs and don't have a custom configuration otherwise the server will try to start using the old Startup command. An example of this is switching a Javascript Egg to a NodeJS Egg and still has the java -jar command.

Advanced Procedures & Issue Diagnostics
Contains advanced documentation and solutions to issues for your panel not commonly needed.
Updating Panel To Latest Version (v1.12.1)
This guide will inform you how to update your panel to the latest version of Pterodactyl. The current version is v1.12.1. You can return to this guide to run the same commands again when the panel is updated.
Panel Update Procedure
Do not continue if you have custom addons, themes or other features installed on the panel. This will remove them and return the panel to the default state. This is your warning, and if not adhered to, there's no return unless you have a backup of your panel.
Login to your VPS/Dedicated server where your panel is hosted. We first will make a backup just in case we mess up anything. Run the commands below to make a full backup of the current live panel.
cd /var/www
tar -zcvf panel-before-upgrade.tgz pterodactyl
We will now begin the update. Navigate to your panel's web directory, which is /var/www/pterodactyl.
cd /var/www/pterodactyl
Run the command below to begin the update.
php artisan p:upgradeThe first question that is asked whether to download the latest archived version from Pterodactyl's GitHub store. Before typing yes, make sure it goes to the github.com/pterodactyl/panel/...etc link, as shown below.

The upgrade system will then state that the webserver user & group should be www-data. If it is not picked up the right one, type no and then update it like the below. Do the same for the "Your webserver group..." as well.


Finally, it will ask if you would like to being the upgrade process. Type yes.

The upgrade system will then continue and fill the screen with the process of upgrading of the new panel, set its permissions and other important steps. Once it's half way through, it will pause and ask you if you would like to run the migration the databases with new updated information. Type yes.


The panel upgrade is now complete.
Wings Update Procedure
To upgrade wings, which is the daemon which runs the servers, copy the commands below on all your nodes which are linked to your panel.
systemctl stop wings
curl -L -o /usr/local/bin/wings https://github.com/pterodactyl/wings/releases/latest/download/wings_linux_amd64
chmod u+x /usr/local/bin/wings
systemctl restart wings
Your wings update is now complete.
Adding Additional Application Versions To Existing Eggs
Note when doing this: If you update your panel and use the commands from the pterodactyl documentation, your changes to the default eggs will be overwritten. You can ignore the command php artisan migrate --seed --force to prevent this but this isn't recommended on panel updates. The main suggestion here is to make nnew eggs for your custom changes.
This does not remove the installed version on a server, just hides it again from the dropdown for the selected docker image.
In this example we will add Java 22 and 23 to the Minecraft Paper egg. Firstly, head on over to Admin > Nests > Click the egg. Look a few sections down and you'll see "Docker Images". In here, make a new line above/below where you want it to appear, and continue reading.

The format of Docker Images to show in the dropdown is NAME PIPE SYMBOL IMAGE SOURCE. For example, Java 23|ghcr.io/ptero-eggs/yolks:java_23. You can normally find the image source from https://ghcr.io/ptero-eggs/yolks and finding the right one you require. Let's go find Java 23. Click the URL above and then "View all tagged versions".

Ctrl + F and find the one you need. Search "java_23" or "java_" and you'll find it. Keep in mind there's many pages so you'll need to keep looking, such as node_ might be on page 3.


As we've searched here, it has the name java_23. If you click on the blue text of the image you need, copy the ghcr.io/... section after the FROM.

Now paste this into the panel, put the Name at the front followed by a Pipe Symbol, and you're done.

This will now appear under servers with that egg under "Startup" tab.

Wings Daemon Causing Containers To Null Route Or Can't Reach Internet
Sometimes the wings daemon doesn't pass along route configuration properly to the docker containers which in turn break DNS and access for plugins to the outside internet. There are two solutions you can try, one is minor and the other is major, dependent on your infrastructure.
Run nano /etc/pterodactyl/config.yml and find the DNS entries under the docker header.
You will notice that the DNS entries are set to CloudFlare, and this is normally the case on every system. We will need to set these to Google, 8.8.8.8 and 8.8.4.4. CloudFlare is not always better in every case and can actually cause DNS problems on software not routed through their CDN's.

Save the file, Ctrl + X, Y then Enter. Restart wings with systemctl restart wings.
Start/restart your server and see if you have the same problem. If you still are experiencing a connection issue, try the solution below.
This is dangerous to do on a hosted client node, such as a hosting company with multiple clients accessing their servers. It's relatively fine if it's just one client with a managed dedicated system, but don't always use this solution as a "go-to" and say job done. It's basically setting the internal networking for docker to the host and not pterodactyl's internal adapter, which can cause plugins to maliciously break out into the root system and containers to speak to the root system which is disabled by default.
Nano back into the wings configuration file and change the network mode under the docker section to "host" instead of "pterodactyl_nw".

Restart wings using the same command. The issue will be permanently resolved as it's using the root systems network and configuration. Still not working? Reach out to one of the system administrators.
Containers Stopping/Crashing Due To Memory/Process Limit Reached
You might be running into this error when running a large MC network or have a server which has many plugins, players and operations going on at the same time.
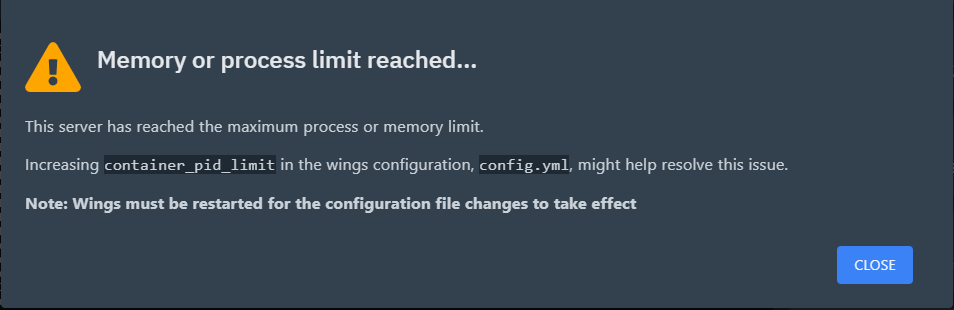
Pterodactyl is running on a Linux OS, which has "PID's". PID means Process ID, and what happens is your server(s) are using more than 512 processes, causing said container to stop, crash or not start up at all. Windows operates the same way and has it's own process ID's for each application. Open Task Manager, go to the "Details" tab and you will see "PID" next to each service.

By default, Pterodactyl Wings, the daemon, is set to 512 PID's, which to us is really daft. It's secure for a reason, as remember, Pterodactyl is mainly written for hosting companies. This is done just in case you have a client who decides to crash or stop a node from running efficiently by tar bombs, PID limits or RAM exploits.
The problem is, this causes an annoyance for networks as it's your own dedicated system and you shouldn't be bothered by this error. At Jasmeow.Systems, we set this to -1 by default to stop this from happening in the future. If you are running your own system however, SSH into the system and go to nano /etc/pterodactyl/config.yml and scroll down to find:

Change the number to -1.

Ctrl + X, Y then enter to come out of nano. Then run systemctl restart wings.

That's it. Your servers won't do this anymore.
Changing The Panel Domain For Pterodactyl
This guide will be using CloudFlare with nginx installed on the server, with the record proxied using port 8443 for the daemon and SFTP requiring an IP connection instead of the hostname. If this doesn't make sense, ask.
Login to your DNS and firstly update the A record to what you wish it to be. For example, I am changing the domain from manage. to panel.

Then SSH into your system and go to /etc/nginx/sites-enabled and update the pterodactyl.conf with your new domain. Easiest way is by nano'ing into it, doing Ctrl + \ (Backslash), typing in "manage." then replacing with "panel." like I did below in the GIF. I then did Ctrl + X, Y then Enter.

Your next step is restarting nginx, systemctl restart nginx. Now head into /var/www/pterodactyl and update the .env file with the new domain under the APP_URL option.

Now head to your panel, in our case panel.jasmeow.systems and login with the same credentials you had previously, everything is the same. Go to the Admin side > Nodes > Click the node > Settings tab. Update the domain in the FQDN box as shown below, make sure your daemon port is 8443 (Or one of the CloudFlare's HTTPS ports) and click "Save Changes" in the bottom right.


Head to the configuration tab and click Generate Token. Pop back into SSH and paste it in, allowing the overwrite.


Restart wings with systemctl restart wings - You are all done and wings should now come back online with a green heart. Not come online? Check the status of wings and solve the error or reach out for assistance.

Understanding The Node Values - The Disk & RAM Information
Pterodactyl panel was written with hosting companies in mind and not for just the average consumer, so a lot of the panel has admin side only additions which aren't used unless you are a host and API integrations with software like WHMCS modules which support such checks.
If you go to the Admin Side > Nodes > Click the node, you will see the following two information boards on the right hand side. You might be thinking "What? How's that 250 million billion whatever value? Isn't there only 500GB disk and 128GB RAM?"

You are correct, but the value can be modified to whatever number you wish. These values are not automatic, and you set these values when you create the node for the first time, or under the "Settings" tab on the top bar then "Allocation Limits" on the right.

Typically, people set this to unlimited, like a billion for example as you see here as it is your own dedicated system. As long as you watch the system resources in SSH such as free -h, df -h and other commands, you will have no issues and you can even setup remote monitoring like HetrixTools pings to monitor the resource levels. The value is a dummy value. Go nuts, set it to what you wish within reason and watch your limits in other ways. The panel does not care what you set this to as a personal user as it won't stop you making servers or starting them manually, it's for limiting creations of servers via the API as explained below.
For a hosting company however, they use billing systems such as WHMCS and with the server module addon "Pterodactyl" or "PteroBill" which automatically creates the server on bill payment by the customer and makes them an account. Now, with these modules, they do API calls to check the node for available space, RAM and allocations before making the server just in case it has no room left. This is where you would set these values to a reasonable amount such as 128GB RAM (131072 MB) so when your billing system allocates a server, you don't run out of room for future customers, over allocating and worrying about degraded performance.
A common misconception is that you should never over allocate as a hosting company. Over allocating is not bad as long as you manage it well. For example, Jasmine has a host herself and set her nodes to unlimited also, but she has many systems in place to warn her of over allocation and usage limits. Think about it, a client isn't going to need all 12GB 24/7 and will idle around 3-4GB when not in use, so allocating 3 servers in that 12GB space is perfectly fine. This applies to CPU also so setting the limit to 200% for 2 whole cores is fine. That server will use all 2 cores on boot but then idle around 20-30%.
As a host running WHMCS, you will meet the error "There are no nodes to satisfy the request" every now and again, meaning that this is basically telling you "A node I am trying to use has run out of something, please check, I cannot auto create a server for this customer." Go check the Disk and RAM values for the node in question including confirming there is enough allocations available.
Getting Rid Of The “Invalid Java Version” Popup In Pterodactyl
Simple config line.
nano /var/www/pterodactyl/resources/scripts/components/server/features/JavaVersionModalFeature.tsx
Delete all const MATCH_ERRORS and enter whatever for the last line and put a comma, like the below for an example.

Save, rebuild panel using ptero's community "build the panel assets" doc.
https://pterodactyl.io/community/customization/panel.html
Disabling The Too Large Directory "First 250 Files" Limiter
By default, the panel limits any directory on a server container to 250 files and folders at any given time in a single view. This is done to improve page loading performance, but can be majorly inconvenient for hosting companies or for networks with large file collections stored in flat format.
Go into /var/www/pterodactyl and edit the following file:
cd /var/www/pterodactyl
nano resources/scripts/components/server/files/FileManagerContainer.tsx
Locate the following code:
<div>
    {files.length > 250 && (
        <div css={tw`rounded bg-yellow-400 mb-px p-3`}>
            <p css={tw`text-yellow-900 text-sm text-center`}>
                This directory is too large to display in the browser, limiting the output
                to the first 250 files.
            </p>
        </div>
    )}
    {sortFiles(files.slice(0, 250)).map((file) => (
        <FileObjectRow key={file.key} file={file} />
    ))}
    <MassActionsBar />
</div>
Replace it with:
<div>
    {sortFiles(files).map((file) => (
        <FileObjectRow key={file.key} file={file} />
    ))}
    <MassActionsBar />
</div>
You can also simply update the code at  and at
  to be a higher number, so the limiter is still in effect. Make sure to update the reason it displays to not confuse clients or other staff members.
Build the panel assets from the following Pterodactyl guide - https://pterodactyl.io/community/customization/panel.html
Once done, you should see the directory no longer have the yellow banner along the top.