
Creating A TCP Shield Account For The Free Plan
If you are wanting to protect your public IP for your MC network from your dedicated system you purchased from OVH for example, but don't need to pay for the bedrock support feature or cannot afford one of the higher plans, you can sign up to TCP Shield using their free plan.
Head over to https://panel.tcpshield.com/register and fill out the details. If you are a Jasmeow.Systems client, please provide the details of the login you just made, we will do the rest.

Click "Add network" and give it an appropriate name:


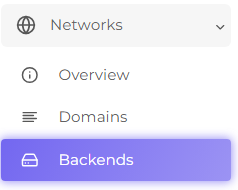
On the left hand side, find "Backends" and on the right side, choose "+ Add Set".

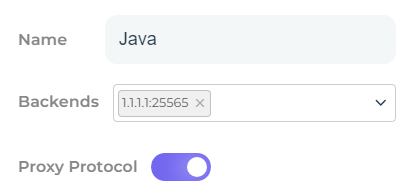
Fill in the relevant details, giving it a name such as "Java" and then putting in the public IP + the port, as shown below, choosing "Save" when done.
Do NOT toggle Proxy Protocol if you are running a standard plain vanilla MC or modded forge server. You will only want to toggle this for standalone Paper servers OR proxy based configurations such as Velocity or BungeeCord.

On the left hand side, click "Domains" and in "Step 1", copy the CNAME.


Pop into your DNS such as CloudFlare and update any records you wish to have when joining your MC Network, such as play, mc, join, @ or any alternative you want to add. You can only add 3 on the free plan, so normally I do play, mc and the @ symbol for the root domain.
In CloudFlare, turn off the cloud so it is just "DNS only". You will have CF reroute sometimes back and fourth causing periodic player connection problems. Not drops, just unreliability in actually joining.

Head back to TCP Shield and click "+ Add Domain" in the bottom right.

Fill in the relevant details, such as the Domain and choose the backend set you made earlier, clicking Add when done.
Most of the time you should get "Domain Verified" with a tick but sometimes you don't. Click Re-check domain and choose CNAME attempting to forcefully verify it. If the CNAME method doesn't work, go back and click TXT record and copy it, putting it into your DNS like the below:
The host being @ and the content being the TXT record you got from TCP Shield.

You can now see it is added and verified. Your final step is to update your MC network configuration.

For each one, reboot to apply, no other configuration is required, but remember that you will no longer be able to use the numerical IP to connect and you have to use the domain.
For Velocity:
Head to the velocity.toml and scroll all the way to the bottom, updating the line haproxy-protocol to true.

For BungeeCord/Waterfall:
Head to config.yml and update the line called proxy_protocol to true.

For standalone Paper:
Have just one server but still want to use TCP Shield? You can still do this by going to:
- For 1.19 servers and above, go to the config folder > paper-global.yml.
- For anything below, find the paper.yml in the root directory.
In this yml file, find the line proxy-protocol and set it to true.
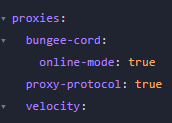
Ignore all other lines, it's squished between the two proxy types to add to the confusion! It's not related to either as in YML it's a indentation to the option variable "proxies" but not indented with bungee-cord or velocity.